AbiJBailey
  • Blog
  • About Me
  • Twitter
  • Instagram
  • Nail Instagram
  • Pinterest

How I Achieve Long, Thick Lashes

17/5/2015

0 Comments

 
Hello Everyone!
Happy Sunday to you!

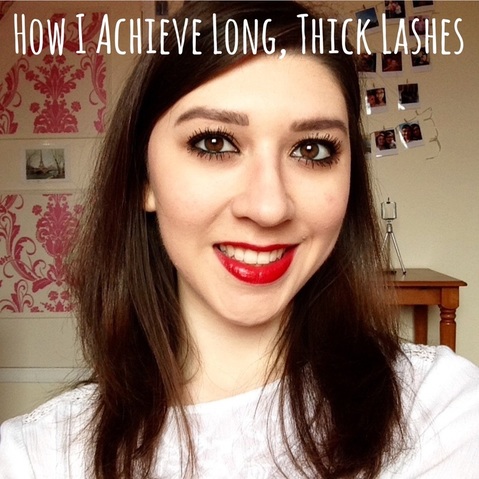
As promised, today I'm going to show you how I get long, thick, fluttery lashes.
No false lashes, lash extensions or growth serums needed. 
How I Achieve Long, Thick Lashes
To achieve this, I use three mascaras. I know to some people that seems like a lot, but I LOVE mascara; if I could only have two beauty products, it'd be mascara and lipstick. 
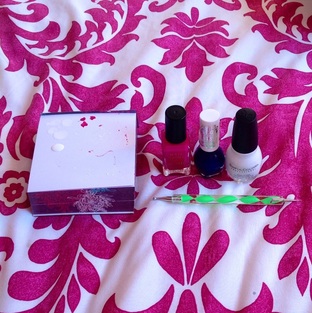
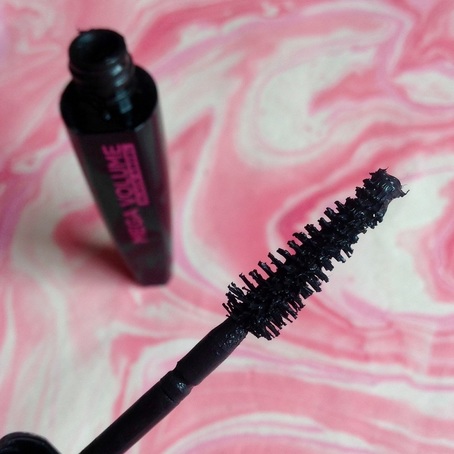
The three I used are:
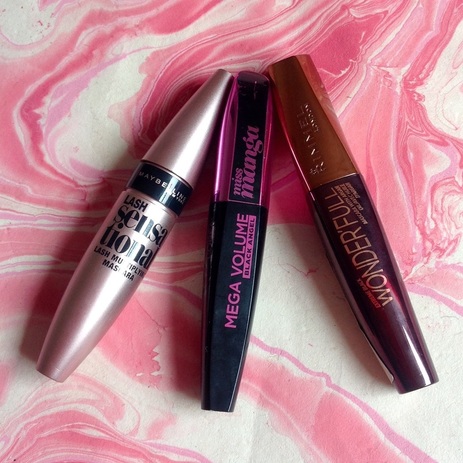
Maybelline 'Lash Sensational' £7.99, L'Oreal 'Miss Manga' £8.99 and Rimmel 'Wonder'Full' £7.99
I'll go into more detail about them at each step. 
Maybelline Lash Sensational Mascara
How I Achieve Long, Thick Lashes
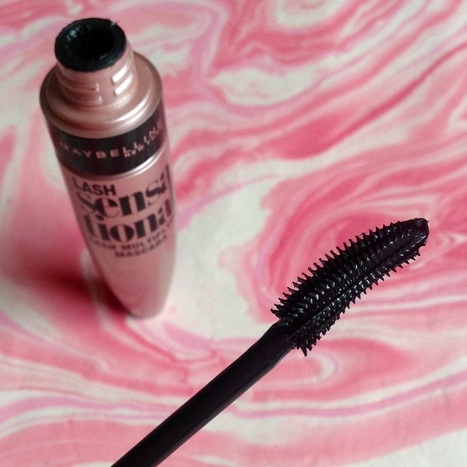
I love Lash Sensational, it has a spoon-shaped brush to catch all the little lashes and if you use the other side, it helps to separate your lashes further. It has a really black pigmentation too and the formula is wet but not too wet, so you can build coats easily, without it clumping or just getting wiped off. 
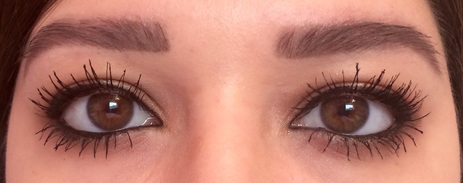
The first step is to coat your lashes with a few coats of Lash Sensational to lengthen and define your lashes. Look at the difference with just a few coats compared to bare lashes. 
P.s. please ignore my brows, they were NOT on point that day. 
Rimmel Wonder'Full Mascara
How I Achieve Long, Thick Lashes
When I first used Wonder'Full, I really didn't like it, I thought the formula was too wet and it didn't make any sort of impact. It sat in my draw for a few weeks before I thought to use it again and I'm glad I did! It had dried up a tiny bit which made all the difference. 
The brush has lots of little bristles and gives you a really natural look, perfect for 'no make up make up'. 
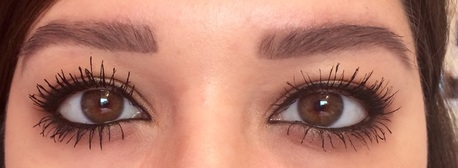
This is the second step, to further define and separate the lashes, I apply lots of Wonder'Full. 
In this photo I have a lots of coats of Lash Sensational and Wonder'Full on the left and lots of coats Lash Sensational on the right.  Even though Wonder'Full is a defining mascara, do you see how it's thickened the lashes?
L'Oreal Miss Manga Mascara
How I Achieve Long, Thick Lashes
I was never that interested in Miss Manga, it just never drew me in, but my mum bought me one and I tried it and was pleasantly surprised. Lovely volumising mascara. It's a bit drier than the other mascaras but still wet enough to prevent clumping. 
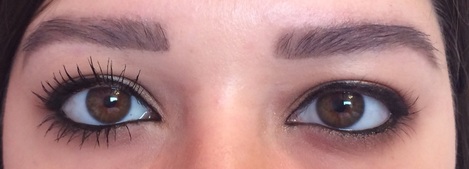
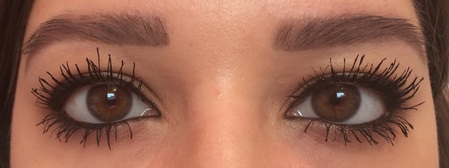
Here on the left I have Miss Manga on, compared to the right with just Lash Sensational and Wonder'Full. 
That's the final step; to apply lashings (haha) of Miss Manga to add real volume and impact. 
How I Achieve Long, Thick Lashes
Here's the end result! Apologies for the poor lighting! 
Picture
Picture
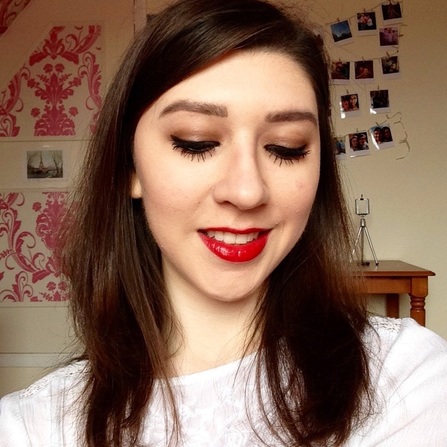
I just keep repeating the steps until I get the length and volume I am looking for. 
I would say these are my holy grail mascaras at the moment, I really suggest getting one (or all three) of them if you haven't got them already! 


Have you tried these mascaras? What do you think of them?
Are there any mascaras you think I need to try?
Leave me a comment!

Thanks for reading and I shall speak you on Friday! 

Abi xxx
0 Comments

Butterfly Wing Nail Art Tutorial

10/5/2015

0 Comments

 
Hello everyone!
Happy Sunday to you.
I have another nail art themed blog post today; this butterfly wing nail art tutorial. 
On Wednesday, it'll be my nail art instagram's second birthday! 
Butterfly Wing Nail Art Tutorial

You Will Need

Butterfly Wing Nail Art Tutorial
- A Base Colour, I chose orange, but an ombré would look incredible, I just didn't have time.  (Barry M 'Block Orange')
- Black Nail Varnish (Barry M 'Black')
- White Nail Varnish (Sinful Colours 'Snow Me White')
- A Surface To Drop Paint On
- A Dotting Tool (Large End & Small End)
- A Long, Thin Paintbrush

Method

Butterfly Wing Nail Art Tutorial
Start by painting a curved line from the top of the nail, down to about one third of the nail on the opposite side. 
Butterfly Wing Nail Art Tutorial
Next, paint three straight lines starting at even intervals across the first line you painted. 
Butterfly Wing Nail Art Tutorial
Leaving space at the bottom of the nail, connect the three straight lines with curved lines. 
Butterfly Wing Nail Art Tutorial
Using the large end of the dotting tool, fill in the bottom of the nail. 
Butterfly Wing Nail Art Tutorial
(I sprayed it with quick dry spray, so that's why it looks gooey). Using the large end of the dotting tool, dipped in white, create two dots. 
Butterfly Wing Nail Art Tutorial
Fill in the remaining space using the smaller end of the dotting tool.
Butterfly Wing Nail Art Tutorial
When I created this on my acrylic nails, I used a Barry M Nail Art Pen (which made it so much easier, I strongly suggest you get one!) and I just used the smaller end of the dotting tool. 


It is a little bit fiddly, especially doing it on your own nails, but I think they're really pretty and definitely worth the effort. 


I'm hoping to do a tiny blog post on Wednesday to commemorate Nail Art Nut's second birthday, but it's the night I work late so I'll have to see!
Otherwise I'll speak to you on Friday for another 5 Things Friday blog post. 


Thanks for reading!


Abi xxx
0 Comments

Acrylic Nail Application

8/3/2015

0 Comments

 
Hello Everyone!
Happy Sunday! Did you know it's also International Women's Day?
Today I thought I'd do a little post showing you how I apply my acrylic nails.
Brace yourselves for some last minute, shocking quality photos...

You'll need:
Picture
- Acrylic Nails (I bought mine from Amazon)
- Nail Glue (Elagant Touch Brush On Nail Glue from Superdrug, £3.09)
- Nail Clippers/Scissors 
- A Range of Nail Files (some more coarse than others)
- Nail Varnish of Your Choice
Picture
Picture
In the set of nails I bought, you get 10 individual packets of different sized nails. For my thumbs, I use packet 0, index finger is packet 4, middle finger is packet 3, ring finger is packet 5 and my pinky is packet 8. As the numbers increase, the nail size decreases. 
This is just a reference as your fingers will probably require different nail sizes to mine!

I find it helpful to lay the nails out in order so I can just grab them easily, but if you're not a mental person, feel free to not bother. 
Picture
I find it easier to paint a lot of glue (And I mean a lot) over my nail, rather than the acrylic nail, and then press and hold in place for ten seconds while the glue adheres. If you prefer to paint the acrylic nail rather than your own, you do that. It's all about preference. 
Picture
Once the nail has had time to stick, use the nail clippers or scissors (Bear in mind that acrylic nails are thicker and stronger than just fake nails. I suggest clippers as my nail scissors broke half way through. It wasn't even the blade, it was the handle! You may have seen it on my Instagram) to roughly cut the shape and length you want your nails. You could cut straight across for square nails, I've been really into the rounded almond shape recently. 
Picture
Using a coarse nail file, file the nail into shape. Use a finer nail file to really smooth out the nail edge and make it look perfect. 
Picture
Do all your nails in the same way and then they'll look a bit like this. Personally I think I did them too short this time around, but that's ok, I've only done them a couple of times. Practice makes perfect!
Picture
Add a lick of paint and you're set! This is two coats of Make Up Academy's 'Amaretto Crush' on top of one coat of Barry M Gelly Hi-Shine in 'Almond'. 
I love the lighter colours, especially Gelly colours, on acrylic nails. The first time I did them, I painted them with 'Almond' and was obsessed. 

Hope that gives you a helpful little insight.

All my social networks are at the top, thanks for reading and I'll speak to you soon!
Abi xxx
0 Comments

L.O.V.E | Valentine's Day Nail Art Tutorial 

13/2/2015

0 Comments

 
Hello everyone!
Yay it's friday! It's also Friday the 13th, are any of you superstitious? 
Today I bring you the last of my Valentine's Day nail art tutorials (that was weirdly formal).
Picture
You Will Need:
Picture
- White Nail Varnish (Sinful Colours 'Snow Me White' [DISCONTINUED IN THE UK]) 
- Black Acrylic Paint (Amazon for about £2ish. It's thinner than nail varnish so it won't string)
- Red Nail Varnish (Miss Sporty Lasting Colour)
- Teeny Tiny Brush (also from Amazon)

Picture
Start by using the teeny paintbrush dipped into the black acrylic and mark out the top, middle and bottom of the 'L'.
Picture
Connect the lines together to pad out the 'L' shape, leaving a little overhang on the end of the base. 
Picture
Fill the bottom half of the 'L' in with the black...
Picture
... And fill in the top with the red. 
Continue the rest of the letters in the same way.
 In the inspiration picture, the 'o' is in a heart shape which is a nice accent, but you could just do a normal 'o' if you wanted. 

This is the end result:
Picture
It was my first time using acrylic paint so they look a bit sketchy. It is thinner than nail varnish though so it's easier to control, but it might need more coats as it can be quite sheer. 

I'm still really pleased with how they turned out!
If you give them a go, make sure to tag me using #abibailey or #nailartnut, I'd love to see them. 

I'm hoping to do a blog post on Sunday but I'm not sure yet,
Have a good weekend and I'll speak to you soon, 


Abi xxx
0 Comments

"Mwah!" | Valentine's Day Nail Art Tutorial

12/2/2015

0 Comments

 
Hello everyone!
Day two of my Valentine's Day nail art tutorials!
Today is this gold and pink "mwah!" design. 
Picture
You Will Need:
Picture
- Light Pink Nail Varnish (Barry M 'Strawberry Icecream') 
- Pink Nail Varnish (Barry M Gelly Hi-Shine 'Pomegranate')
- Gold Nail Varnish (Barry Foil Efects 'Gold')
- Teeny, Tiny Paintbrush (From Amazon) 

Picture
Paint your nails light pink and let them dry. 
Dip the brush into the pink and paint the bottom lip by creating a sort of squashed love heart. 
Picture
Then paint the top lip which is a bit like two connecting triangles. 
Picture
Finish with a few horizontal gold stripes, and you're all set! 

As usual; super easy and very cute!
If you give these a go, make sure to tag me using #abibailey or #nailartnut 


Thanks for reading and I'll see you tomorrow with another tutorial! 


Abi xxx

0 Comments

Valentine Roses | Valentine's Day Nail Art Tutorial 

11/2/2015

0 Comments

 
Hello Everyone! 
Today is the first of my Valentines Day nail art tutorials! 
Today it is these 'Valentine Roses'
Picture
You will need: 
Picture
- Light Pink Nail Varnish (Barry M 'Strawberry Icecream')
- Pink Nail Varnish (Barry M Gelly Hi-Shine 'Pomegranate')
- Green Nail Varnish (Barry M 'Spring Green')
- Black Acrylic Paint (from Amazon for £2ish, or any craft shop) or Black Nail Varnish 
[Acrylic paint is thinner so it won't string like some black nail varnishes]
- Teeny, Tiny Paintbrush (also from Amazon, also very cheap)

Picture
Paint your nails light pink and let them dry. 
Using the brush of the pink nail varnish, make random blobs on the nail, they shouldn't be neat. 
Picture
Using the teeny, tiny brush dipped in the green nail varnish, make little leave shapes around the blobs (roses). 
Picture
Picture
Picture
Again, using the teeny, tiny brush, make random swirls with the black paint, to look like the petals. 
Then you're done! It's looks like lots of steps but they're quite simple. 

I love doing roses, they're one of my favourite nail art designs to do because they look so pretty and they're so easy to do. 

If you recreate these, make sure to tag me using #abibailey or #nailartnut, I'd love to see them. 

See you tomorrow with another nail art tutorial! 

Abi xxx
0 Comments

Stag's Head | Christmas Nail Art Tutorial

17/12/2014

0 Comments

 
Hello everyone! 
This week's tutorial is of this stag's head. Not particularly Christmassy, but festive all the same. 
Picture
You wil need:
- A base colour, I chose white but apparently didn't feel like photographing it! (Sinful Colours 'Snow Me White')
- Red Nail Varnish (Miss Sporty Lasting Colour) 
- A Thin Paintbrush 

Picture
Picture
Start by making a rectangle on the bottom half of the nail, then add a semi circle below it to create the stag's head. Fill them in. Leave lots of room at the top of the nail for the antlers. 

Picture
Next, round off the top of his head and give him little ears. 

Picture
Lastly, create the antlers. Create two curved lines, starting from the top and leaving space in the middle. 
For the little antlers, just create two lines curving towards the middle but not touching. 

And that's it! I know I say this A LOT but wasn't it easy? It's always easier to break things down into steps... That, and I don't do things that are difficult!

If you recreate this make sure to use #abibailey or #nailartnut so I can see them!

I'll be back on Sunday with a gingerbread man recipe. Yum yum!

Thanks for reading and speak to you Sunday,
Abi xxx
0 Comments

Santa's Hat | Christmas Nail Art Tutorial

10/12/2014

0 Comments

 
Picture
Hello everyone!
This week's tutorial is Santa's hat. 
As usual, it's pretty simple and I've broken it down into steps for you. 
You will need: 
Picture
- Flesh Toned Nail Varnish (Revlon Nail Art Expressionist in '330/Silhouette')
- White Nail Varnish (Sinful Colours 'Snow Me White) [DISCONTINUED IN THE UK]
- Red Nail Varnish (Miss Sporty Lasting Colour)
- Thin Paintbrush 

Let's get started!
Picture
Start by painting your nails a flesh tone colour and then paint a white stripe across the middle of the nail. 
Picture
In the space above the white stripe, fill it in with the red. 
Then using the thin paintbrush, create a curvy, upside-down triangle and make sure that the point reaches the middle of the bottom section of the nail. 
Picture
Lastly, neaten up the shape and add a white blob at the bottom of the point, to create the fluffy bobble on Santa's hat. 

That's it! If you recreate any of my nail art designs, make sure to use #nailartnut or #abibailey so I can see them! 

Thanks for reading and speak to you on Sunday, where I'll show you how I've decorated my room for Christmas. T'is the season!

Abi xxx
0 Comments

Santa's Belt Buckle | Christmas Nail Art Tutorial

3/12/2014

0 Comments

 
Hello everyone!
Here is the first Christmas nail art tutorial: Santa's Belt Buckle!
You only need three colours and one tiny brush, so it's super easy.
Let's get started. 
Picture
You will need: 
- Red Nail Varnish (Miss Sporty Lasting Colour)
- Black Nail Varnish (Striper from Primark)
- Silver Nail Varnish (Barry M Foil Effects) 
- Thin Paintbrush 

Picture
Picture
Starting with a red base, paint a black strip across the third (lower) quater of the nail. 

Once that has dried, paint a small silver line, starting from the middle of the black strip, stretching across to the right side. 

Lastly, create a silver box, going through the silver line and extending past the black strip, above and below. 


How mega easy was that?! Only two simple steps. 


I think this makes a nice accent nail and would look fab paired with the next nail art design I have lined up... Keep your eyes peeled over here and on my nail art instagram! 


I'll be back with another blog post on Sunday. 
As always thanks for reading and speak to you soon!
Abi xxx
Picture
0 Comments

Gold Glitter Chevrons | Nail Art Details 

20/11/2014

0 Comments

 
Picture
Hiya!
These are the details for the 'Gold Glitter Chevrons' nail art that you might have seen on my nail art Instagram (@nailartnut). 
It's approaching Christmas time so I'm starting to get festive and play around with glitter a bit more plus I was dying to use my new chevron stencils!

Here's what I used:
- Sally Hansen Maximum Strength 
- Miss Sporty Lasting Colour in either 3294 or 160 (I'm not sure which number is the colour) 
- Chevron stencils from She Sells Seashells (see last blog post here)
- Barry M Aquarium Collection in 'Treasure Chest' 


Speak to you on Sunday!
Abi xxx
0 Comments

Spider Nail Art Tutorial

26/10/2014

0 Comments

 
Here's what you'll need:
Hello everyone!
I have another nail art tutorial for you today (sorry if you're getting bored of them, my blog will be back to normal soon!) 
Today is this incy wincy Spider, you need very little to create him! Let's get started. 
Picture
Picture
- White Nail Varnish (Sinful Colours 'Snow Me White')
- Black Striper/Nail Varnish (From Primark)
- Dotting Tool (or Bobby pin)

Picture
Using the black striper, draw a line from the top of the nail, down to the middle. 
Next, using the dotting tool and the black, make a large dot at the end of the line. 
Picture
Make a smaller dot directly below the dot you just made, overlapping it slightly. 
Picture
Using the striper, create the four smaller, inside legs. 
Picture
Lastly, create the last four legs, starting from the middle of the spider's body. 

There we go, looks a bit tricky but isn't too bad. 
Picture
I created this spider web by drawing four diagonal lines from one corner and linking them with little 'U' shapes. 
Picture
Also how cute are these cupcakes that my sister made and decorated?! So simple, yet so effective (and very tasty) 


That's it from me today! As usual if you recreate these make sure to tag them with #NailArtNut and/or #AbiBailey, I'd love to see them! 


I'll probably speak to you in the middle of the week with another tutorial, I'm not sure yet, otherwise it'll be Sunday like usual!


Thanks for reading!
Abi xxx
0 Comments

Jack O' Lantern Nail Art Tutorial

22/10/2014

0 Comments

 
Hello everyone! 
Ooh a mid week blog post, how sneaky...
I'm going to post the tutorial today as Halloween is creeping (get it?) up on us and I have a lot of designs I want to share with you before the occasion is over. 
This design is so quick and simple but looks really effective! Let's get going. 

Picture
Here's what you'll need:
Picture
- Orange Nail Varnish (Barry M 'Block Orange')
- Brown Nail Varnish (Barry M 'Paprika')
- Black Nail Varnish (with a tiny brush) or Striper
- Long thin paintbrush
Totally optional:

- Glow In The Dark Nail Varnish (from Topshop last year)
Picture
Start with an orange base (and a couple of coats of glow in the dark nail varnish if you're feeling fancy) and use your long thin paintbrush to create two lines vertically down the nail to add texture. 
Picture
Create three triangles for the eyes and nose holes. 
Picture
Lastly create an upside down crown shape for the mouth (or come up with your own, much better shape)
Picture
Voila! Said it was easy, didn't I?
Looks pretty good in the dark too!

Don't forget to tag me if you recreate this! I'd love to see them. :) 
#nailartnut #abibailey

Thanks for reading and hopefully speak to you on Sunday!
Abi xxx
0 Comments

Tiny Polka Dots and Little Gems | Nail Art Details

8/8/2014

0 Comments

 
Picture
Hello everyone! 
As promised here are the details for my latest nail art design.  

- Essie 'Madison Ave-Hue'
- White Striper/Dotting Tool from Primark
- Little Tear Shaped Gems from a gem wheel I bought in Primark a while ago 
- Sally Hansen 'Double Duty Base & Top Coat' (for shine and to adhere the gems)
- A wooden skewer dipped in a tiny bit of top coat to help place the gems

Talk to you on Sunday! 
Abi xxx
0 Comments

'Brogue' Style Nail Art | Tutorial

27/7/2014

0 Comments

 
Hello Everyone!
Hope you've all had a fun weekend.
Today I thought I'd do a nail art tutorial as my blog has been very make up and shopping based recently (which I love but thought it needed a change). 
I saw this design on Instagram but as it was just featured and not by the actual account holder, I can't credit it. I'm not sure what you'd call it but it reminds me of the black and white brogues! 
Picture
Here's what you'll need:
Picture
- Bright Pink/Coral Nail Varnish (Sinful Colours in 'Folly')
- White Nail Varnish (Sinful Colours in 'Snow Me White')
*Bare in mind Sinful Colours has been discontinued in the UK*
- A White Striper and a Black Striper (Mine came in a set of three from Primark and have dotting tools built into the cap)
(- Black paint and a small dotting tool/tooth pick if you don't have the stripers from Primark)
- Masking Tape and Scissors (Not a necessity, it just makes the first step quicker/neater)


Picture
Starting with a pink nail, using two small bits of masking tape, cover the bottom of the nail to create a triangle at the top.


Alternatively, you could just use a white striper to create two lines and then fill it it.
Picture
Paint over the triangle shaped gap with the white (you might need to be quite generous to get an opaque colour) and then quickly but gently remove the tape to get clean lines.


You could also use the white striper to do this or just to neaten up the edges.
Picture
Using the black striper create a V along the edge and then a small triangle at the top. 


The best way to do this is to hold the striper at the middle and gently pull back and then do the same for the other line. 
Picture
Using the dotting tool end of the striper (or a dotting tool/tooth pick dipped in black paint) create a row of little dots between the V and the triangle.
Picture
Using the black striper, map out the step shapes (if you don't know what I'm on about, scroll back to the top to look at the design).


This could take a couple of attempts to get it right (can you tell?).
Picture
Fill the step shapes in with the black striper or a big dotting tool dipped in black paint.
Picture
Once everything has dried, use a top coat to smooth out the design and make it long lasting.


And you're done!


There's quite a lot of steps to this one, but once you break it down it's not too tricky! 
That's it for this week! If you do give them a go use #AbiBailey or #NailArtNut, I'd love to see them! 

As always, thanks for reading and I'll speak to you soon!

Abi xxx
0 Comments

Watermelon Nail Art Tutorial

2/7/2014

0 Comments

 
Hello everyone! 
As promised, here is the mid-week blog post of the watermelon slice nail art tutorial! 
Enjoy!
Picture
Here's what you'll need:
Picture
- Green nail varnish (Barry M in Spring Green)
- Red/Pink nail varnish (Barry M Gelly Hi-Shine in Pomegranate)
- Lilac nail varnish (Miss Sporty Quick Dry Clubbing Colours in 344)
- Light Green nail varnish (Sinful Colours in Mint Apple*)
- White nail varnish (Sinful Colours in Snow Me White*)
- Small Dotting Tool
- Small/Thin Brush
*Sinful Colours is being discontinued in the UK
(I have no idea about the rest of the world)

Picture
I used lilac as my base colour, but as I said last time, you can use whatever colour, I just thought it was summery and contrasted well with the green and pink.
Using the brush dipped in white, map out a triangle shape for the watermelon slice, and fill it in using the brush, the nail varnish brush, or a big dotting tool.
Picture
Cleaning off the white from the brush, dip it into the dark green and paint a stripe along one of the edges. This will be the skin of the watermelon.


You might need two coats to get a good opacity, I did.
Picture
Again, remembering to clean off the brush, leave a gap to look like the rind and fill in the rest of the triangle with the pink/red.


(It drives me mental that you can't resize the text boxes!)
Picture
Once the green has dried, use the dotting tool dipped in the light green to add some dots to add more depth and texture to the skin of the watermelon.

You could if you wanted to, add a few tiny black dots to the pink to look like pips but a) I only just realised I had forgot to do that and I took the photos last week, b) It might make the small space look dark, and c) the design is actually quite small in reality so it would go unnoticed anyway.


Done!
Another colourful summery design, this would also look cute as an accent nail.
When you break it down it's easy to manage!
I would love to see your recreations so if you give them a go, tag me in them or use the hashtag #nailartnut or #abibailey, I'll be on the lookout!


I should be back on Sunday with another post for you, until then,
thanks for reading!
Abi xxx
0 Comments

Strawberry Nail Art Tutorial

29/6/2014

0 Comments

 
Hello Everyone!
I have another nail art tutorial today, trying something more summery. If you've seen my Nail Instagram you'll have seen the little summery patterns I have been trying out, if not you can view it here :)
Anyway as you've seen from the title, today's tutorial is this big strawberry.
Picture
Here's what you'll need:
Picture
- Yellow nail varnish (Maybelline Colour Show in 749 Electric Yellow)
- Green nail varnish (Barry M in Spring Green)
- Red nail varnish (NYC Quick Dry Nail Polish in Madison Avenue)
- Lilac nail varnish (Miss Sporty Quick Dry Clubbing Colours in 344)
- White nail varnish (Sinful Colours in Snow Me White, BUT they are discontinuing the range :()
- Small paintbrush 
- Small dotting tool
Picture
Start off with a lilac base, I chose lilac as it's a very summery colour, supposedly 'vivacious orchid' is this year's 'in' colour? and because it really contrasts with the red. 
You could use what ever colour you like, pale blue also looks nice.
Using the little paintbrush and the white, map out the strawberry shape with the leaves at the top and fill it in.
Picture
Using the red, fill in the strawberry part, making the top almost heart shaped. 
You could use the little paintbrush, a big dotting tool or just the brush that comes with the nail varnish to do this.
Picture
Using the green and a dotting tool or little paintbrush, fill in the leaves.


Using the yellow and the little dotting tool, add dots to look like seeds
Picture
The seeds might require two coats to make the yellow really pop.


Once everything is dry, top coat it to seal the design and help it last longer.


And you're done!


(It bothers me that you can't resize the text boxes!)
Super easy and very summery, I think this would work well as an accent nail!
I would love to see your recreations so if you give them a go, tag me in them or use the hashtag #nailartnut or #abibailey


I also have a watermelon tutorial that I'm planning on putting up in the middle of the week so look out for that! 

Otherwise I shall see you next time,
thanks for reading, 
Abi xxx
0 Comments

Easter Egg Nail Art Tutorial

4/4/2014

0 Comments

 
Hello everyone!
Today is the last day of my Colossal Easter/spring Nail Art Week! It's been fun.
Today's look is the Easter Egg design. It's very easy and totally customisable. Here it is.
Picture
Picture
You Will Need:
  • Lilac nail varnish (mine is Barry M, Gelly Hi-Shine 'Prickly Pear')
  • Blue nail varnish (Barry M 'Blueberry Icecream')
  • Yellow nail varnish (Maybelline Colour Show 'Electric Yellow')
  • Green nail varnish (mine is super old from a nail art set I got years ago)
  • A dotting tool (or bobby pin) 
  • A thin paintbrush 

Picture
Dip the thin paintbrush into the green and create two chevron (diagonal) lines.

Picture
Clean off the paintbrush and dip it into the yellow and create another chevron stripe. 
Dip the dotting tool into the blue and create a line of dots along the green chevrons. 


As usual leave lots of time for drying so that if you want to topcoat it, it won't smear. 
It's nice and festive isn't it! 

Well that's it for the Colossal Easter Nail Art Week, I've enjoyed it and I hope you have too. 

If you try out these designs use the hashtag #easterblogweek and I'll check them out! 

Maybe see you Sunday? I'm not sure yet, otherwise I'll see you when I see you.  


Abi xxx
0 Comments

Bunny Nail Art Tutorial

3/4/2014

0 Comments

 
Hello everyone!
We're nearly at the end of my Easter/spring nail art week! Today's design is the Bunny one. He's really cute and quite easy to do. Let's get started. 
Picture
Picture
You Will Need:
  • Pink nail varnish (mine is super old from Primark)
  • Silver nail varnish (Barry M Instant Nail Effects, Foil Effects 'Silver')
  • Black Nail Varnish (Barry M 'Black')
  • White nail varnish (Sinful Colours 'Snow Me White'
  • Green nail varnish (mine is from a nail art set I got years ago)
  • A thin paintbrush 
  • A dotting tool (or bobby pin)

Picture
Starting with a green base, use a thin paintbrush dipped in white to mark out the shape of the Bunny's head and ears.

Picture
Then using a dotting tool or the brush that comes with the white, fill it in.

Picture
Now using a thin paintbrush dipped in pink, mark out the inner ears and fill them in with a dotting tool or the thin paintbrush. 

Picture
Now, using a dotting tool or bobby pin dipped in pink, make a dot in the middle to create the nose.
Clean off the dotting tool, dip it into the black and create two dots either side of the nose and slightly higher for the eyes.
Using the thin paintbrush dipped in silver, create two arrow shapes (> and <) either side of the nose for the whiskers.


If you want to top coat him, give him a while to dry because black smears terribly.

There you have your little Bunny! Isn't he sweet?


Tomorrow is the last day and will be the Easter Egg design, so make sure you pop back for that!


See you then, 


Abi xxx
0 Comments

Polka Dots Nail Art Tutorial

2/4/2014

0 Comments

 
Hello everyone! 
Welcome back to day three and quite possibly the most pointless nail tutorial ever! I understand that no one needs a tutorial for this but once I had done the five designs and then the colossal nail art blog post, it was only then that I realised this isn't really a design. Anyway here it is.
Picture
Picture
You will need:
  • Pink nail varnish (mine is Barry M Gelly Hi-Shine 'Dragon Fruit'
  • White nail varnish (Sinful Colours 'Snow Me White' 
  • A dotting tool or bobby pin

Picture
Starting with a pink base, dip the large end of the dotting tool (or bobby pin) into the white and methodically place dots around the nail.
I like to start in the middle, creating dots evenly spaced apart and then either side, also evenly spaced apart.


You could use colours that link with the other designs or use more springlike colours. 


The smaller the dots, the daintier it looks, but with fun nail art designs like these Easter ones, I think larger dots work better.
But it's totally up to you!

I bet you're glad you wasted your time reading that! I promise tomorrow's will be more interesting as I will be doing the Bunny design, it should be fun!

See you then, 


Abi xxx
0 Comments

Daisies Nail Art Tutorial

1/4/2014

0 Comments

 
Hello everyone !
Welcome back to day two of my colossal Easter/spring nail art tutorials. Today's tutorial is the Daisies design. It looks quite involved, but that's because it's got lots of layers, it's really very simple. Give it a go!
Picture
Picture
You will need:
  • Pink nail varnish (mine is from Primark and is very old and running out)
  • Light blue nail varnish (Barry M 'Blueberry Icecream')
  • Green nail varnish (Barry M 'Spring Green')
  • Light green nail varnish (mine is from a nail art set I got years ago)
  • White nail varnish (Sinful Colours 'Snow Me White')
  • A thin paintbrush 
  • A dotting tool (or bobby pin/toothpick)

Picture
Starting with a blue base, use a thin paintbrush dipped in green to stroke blades of grass (start from the bottom of the nail)


You might need to do this a couple of times to get an opaque colour

Picture
Using the thin brush dipped in light green (mine is also shimmery) create more blades of grass, just fewer so it doesn't cover the darker green.

Picture
Now using the larger end of the dotting tool (or bobby pin), create five dots to create the daisy (you might want to place one in the middle to connect them).

Picture
Using the smaller end of the dotting tool (or bobby pin) dipped in the pink, create the centres of the daisies. 


Then that's it! If you want to top coat them make sure you leave ample time for it to dry or it might smear. 


Hope you like it, tomorrow's tutorial will be the pink and white dots (not very exciting I know)


See you tomorrow!

Abi xxx
0 Comments

Chick Nail Art Tutorial

31/3/2014

0 Comments

 
Hello everyone!
As promised here is the Chick nail art tutorial. It's simple and very cute, so give it a go! 
Picture
Picture
You will need:
  • Orange nail varnish (mine is Barry M 'Block Orange')
  • Black nail varnish (Barry M 'Black')
  • White nail varnish (Sinful Colours 'Snow Me White' - my all time favourite white polish!)
  • Yellow nail varnish (Maybelline Colour Show 'Electric Yellow')
  • A small paintbrush
  • And a dotting tool (or a bobby pin/toothpick)


Picture
Using the tiny paintbrush or a tooth pick dipped in white, mark a zig zag across the bottom third of the nail and then fill in the bottom with the white.

Picture
Using the larger end of the dotting tool (or bobby pin) dip it into the black to dot two eyes then clean the dotting tool and dip in into the orange. Press down and drag slightly across to make the beak.

Leave lots of time for it to dry if you want to top coat it, otherwise it might smear.


There you have it! Told you it was easy. 

Pop back tomorrow for the Daisies tutorial.

See you tomorrow, 

Abi xxx
0 Comments

Colossal Easter Nail Art Week

30/3/2014

0 Comments

 
Hello everyone!  
Happy Mothers' Day! 
As usual I've been useless with regularly posting on here, and have been EVEN worse on my nailstagram (yes I actually call it that) but I'm back today! I thought as an apology for being rubbish and because I have been lacking nail art in my life recently, I thought I'd do a spring/Easter nail art week. What I mean by this is that I have five spring/Easter nail art tutorials and I am going to post one a day (starting from tomorrow). Does that sound fun? Here's the photo of the five designs...
Picture
You could wear these all together or just use one as an accent nail or you could wear one design across all of your nails, it's up to you. I know the pink and white one is a bit of a cheat but it looks dainty across all of your nails and works well with the other four designs- it adds a bit of calm to liveliness of the others.
Those are the designs, get excited, I'll be back tomorrow with the chick design! 


Hope you've had lovely weekends, I'll see you tomorrow!


Abi xxx
0 Comments

Alexa Chung Inspired Nail Tutorial

2/2/2014

1 Comment

 
Hello everyone! 
Sorry it's been two weeks since I posted, the week before last I just had nothing to tell you or show you and I wasn't at my best and last week I was ill so the last thing on my mind was my blog! But I'm back now with a little blog post showing you how I recreated Alexa Chung's daisy nails (the photo is on my Nail Instagram). So let's get started!
Picture
Picture
This is a very basic nail art so you don't need much skill or any special tools. Here I have a double ended dotting tool, one end has a large bobble while the other has a smaller bobble. If you don't have a dotting tool, a bobby pin and a tooth pick will do the same job. I have a block of paper for dripping the paint onto and the three colours which are:
- Barry M in Fuchsia
- Miss Sporty Clubbing Colours Quick Dry in 328 (It doesn't have a name which I find dissapointing)
- Sinful Colours in Snow Me White
Picture
Start by painting your nails navy. When I did these on my real hands I used a base coat which I strongly suggest you do anyway because navy is a dark colour which may stain your nails and as I do my nails all of the time, they need a little extra protection.
Picture
Next drip some white nail varnish onto a surface.
Picture
Using the large bobble of the dotting tool or bobby pin, create six dots, one in the middle and five around it. 
Picture
Next drip a little pink nail varnish onto a surface.
Picture
Now using the smaller end of the dotting tool or a tooth pick, create a small dot in the middle for the centre of the daisies.


There you have it! Told you they were simple and don't they look pretty?
Picture
This is the photo on my Nail Instagram, head over there and have a look.
So that's it for this week, I'll be back next week with a beauty related post (shocker, I've actually got something planned) so look out for that! If you want to know when/whether I'm posting a blog post you could follow my twitter as I always tweet about posting a new blog post or whether I'm not feeling up to it, that way I'm not leaving you in the lurch!


Any way, speak to you soon!


Abi xxx
1 Comment
    Abi Bailey
    Follow
    Hello Everyone!
    Thank you for visiting my blog; I post about beauty and lifestyle. Have a read and let me know what you think.
    All my social networks are at the top if you want to keep up with my daily life!
    Abi xxx
    Submit

    Archives

    September 2016
    August 2016
    July 2016
    June 2016
    May 2016
    April 2016
    March 2016
    February 2016
    January 2016
    December 2015
    November 2015
    October 2015
    September 2015
    August 2015
    July 2015
    June 2015
    May 2015
    April 2015
    March 2015
    February 2015
    January 2015
    December 2014
    November 2014
    October 2014
    September 2014
    August 2014
    July 2014
    June 2014
    April 2014
    March 2014
    February 2014
    January 2014
    December 2013
    October 2013
    September 2013

    Categories

    All
    5 Things Friday
    Advice
    Baking
    BEAUTY
    Beauty Favourites
    Birthday
    Blog
    Bloglovin
    Christmas
    Day Out
    DIY
    Easter
    Family
    Fashion
    First Entry
    Glossybox
    Goals
    Hair
    Halloween
    Lifestyle
    Make Up
    Nail Art
    Nail Art Details
    Nailartnut
    New Year
    Ootd/ootn
    Recommendations
    Review
    Shopping/Haul
    Skincare
    Tutorial
    Valentine's Day

Powered by Create your own unique website with customizable templates.