AbiJBailey
  • Blog
  • About Me
  • Twitter
  • Instagram
  • Nail Instagram
  • Pinterest

Real Techniques Brushes and Train Case  Gift Set

10/1/2016

0 Comments

 
Hello everyone!
Hope you all had a lovely Christmas and  New Year.
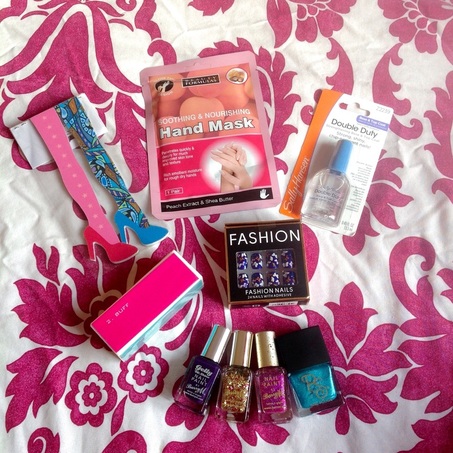
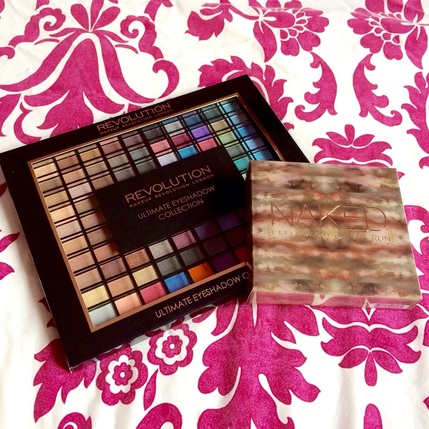
I'm not really a fan of those 'What I Got For Christmas' blog posts but I did get a couple of luxuries that I would like to share with you.
As I took a tonne of photos I'm going to split the posts up.
I'm working with a new lighting and backgrounds set-up at the moment, so if my photos are a bit weird, I'm in a bit of a trial and error stage. 
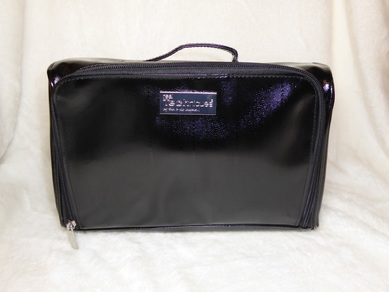
This week's post is about the Real Techniques Limited Edition  10 Brushes and Train Case Gift Set . 
Next Sunday will be about the Smashbox Try It Kit Bestsellers.
The Sunday after that will be about the Ciaté Mini Mani Month Advent Calendar.
So let's crack on.


Picture
Real Techniques Limited Edition Brushes and Train Case Gift Set | abibailey.co.uk
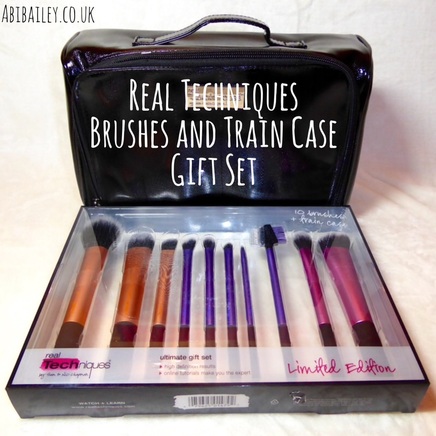
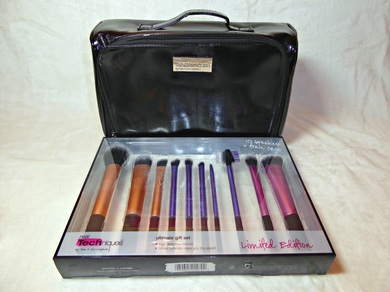
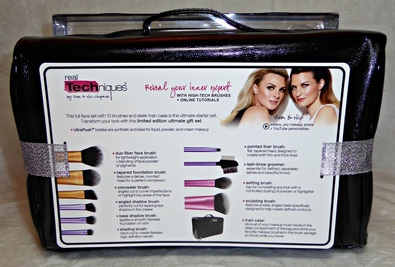
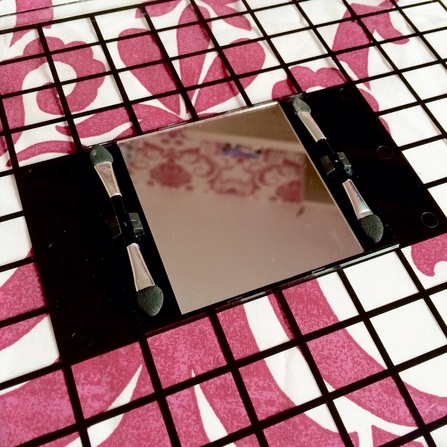
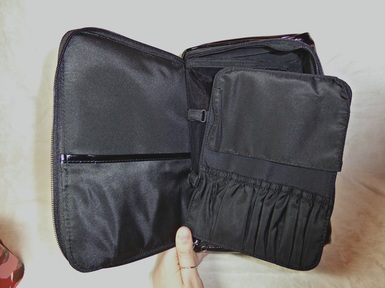
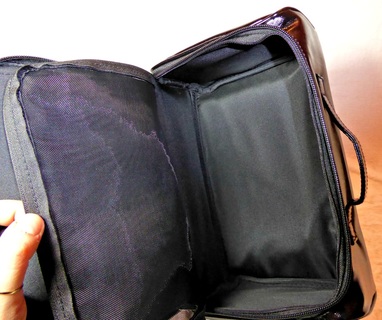
The train case is incredibly handy, especially  if you  travel a lot. 
Even if you don't it's great for storage. It has a huge compartment to store all your make up and a separate compartment for  brushes and even a extra pouch in the lid. Perfect.
Real Techniques Limited Edition Brushes and Train Case Gift Set | abibailey.co.uk
You get 10 brushes with the set and I am so excited to use them. I already own a couple of them but there are so many that are new to me.
I'm expecting my make up to be flawless when I use these!
Real Techniques Limited Edition Brushes and Train Case Gift Set | abibailey.co.uk
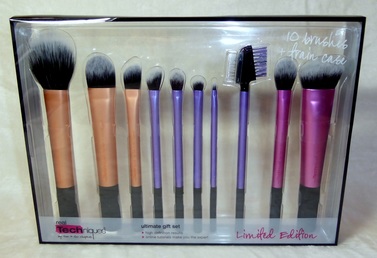
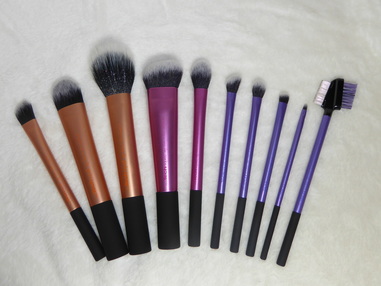
First up are the Base Brushes:
Real Techniques Limited Edition Brushes and Train Case Gift Set | abibailey.co.uk
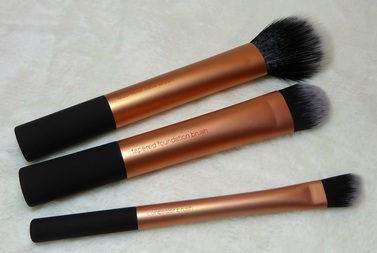
From smallest tot largest you get:
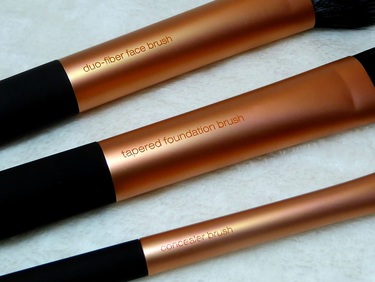
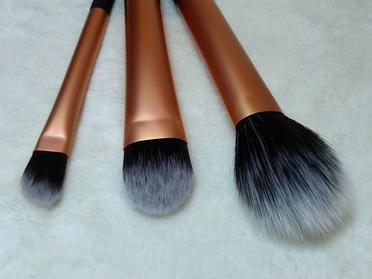
the Concealer Brush
the Tapered  Foundation Brush
​ the Duo-Fibre Face Brush.
All pretty self explanatory.
I haven't used any of the brushes yet because I want to have a sort out of my current ones, but the  bristles   on these are super soft.

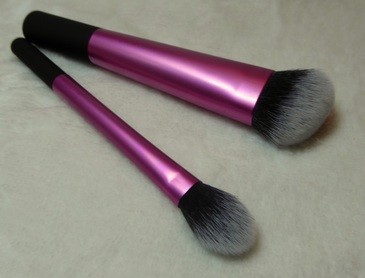
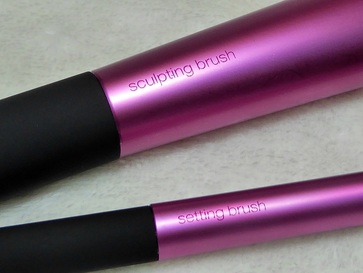
​Next are the Face Brushes:
Real Techniques Limited Edition Brushes and Train Case Gift Set | abibailey.co.uk
You get:  
the Sculpting Brush which is perfect for contouring or blush application and 
the Setting Brush which is great for setting places like the under eye area.

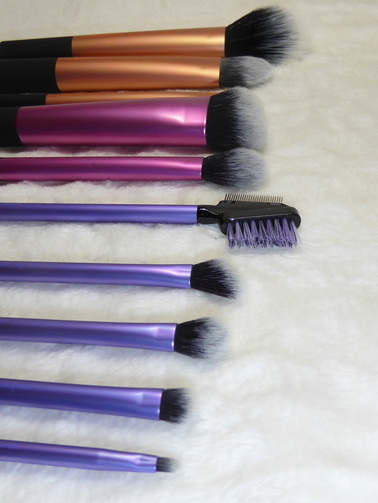
Lastly is my favourite, the Eye Brushes:
Real Techniques Limited Edition Brushes and Train Case Gift Set | abibailey.co.uk
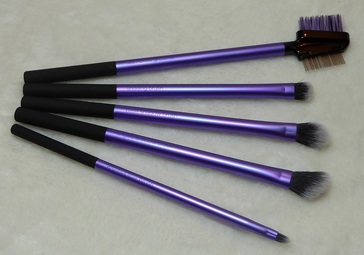
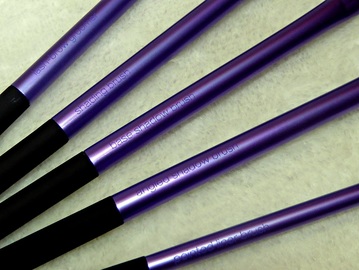
With the Eye Brushes you get:
the Lash-Brow Groomer
the Shading Brush
the Base Shadow Brush
the Angled Shadow Brush
​the  Pointed Liner Brush
I think good quality make up brushes have a big impact on the application so  I think these will make a big difference. I've never had  any good quality eyeshadow blending brushes so I think these will be  great for my collection!

I didn't think I'd get this gift set as it was quite pricey, even on offer, but I was very lucky! I think this is the perfect  starter set too - every brush you could possibly need plus a handy carry case. 
Definitely worth the money.

Do you have any of these brushes? 
Do you use Real Techniques or are there other brushes I need in my life?
Leave me a  comment!

Thanks for reading, make sure you pop back next week to see what's in  the Smashbox Try It Kit Best Sellers.

​Abi xxx


0 Comments

Building a Gingerbread House

16/12/2015

0 Comments

 
Hello Everyone!
Little mid-week blog post for you today.
I built  a gingerbread house (from a kit) with my sister.
We bought the kit from Tesco for £4!
​Here we go...


Building A Gingerbread House | abibailey.co.uk
Picture
In the kit, you get:
- the building tray
- the walls and roof pieces
- the squeezy icing
- different sweets for decoration

On the back of the box you get easy to follow instructions with pictures too.

Picture
Picture
You squidge a lot of the icing into the grooves in the tray and ice the back sides of the front and back walls and pop them into the tray. After that you slide the smaller walls in between, gently pressing to help them stick.
Picture
Picture
Once you've let the walls set, ice along the top of the front and back walls and gently place the roof pieces on. Hold them in place for a minute to let them adhere and then let the whole house set for half an hour (You could catch up on Big Bang Theory like we did).
Picture
Picture
Once your house has set, you can get to decorating! We mimicked the design on  the box with a few of our own little twists.
Picture
I'm really pleased with how it turned out and it was made much easier with the tray.
It was lovely  to spend time with my sister too.

Have you ever made a gingerbread house?  Have you ever been really brave and  built one from scratch? Leave me a comment!

Thanks for reading,  I'll speak to you soon!

​Abi xxx

0 Comments

Winchester Christmas Market

13/12/2015

0 Comments

 
Hello everyone!
Happy Sunday!

On Wednesday afternoon, my mum, my sister and I took the train to Winchester so that we could mooch around the Winchester Christmas Market. Winchester is always lovely anyway and we had a really wonderful day out. Here are a few of the photos I took.
Winchester Christmas Market
Let's start with an OOTD.
OOTD / abibailey.co.uk
My jumper is from New Look and is classed as a 'jumper dress', I wouldn't wear it as a dress because it would be too short on me! It had 25% off when I bought it too. 
My jeans are from Sainsbury's.
My boots are old and from Primark, despite the  block heel they are so comfy and because I knew we'd be doing a lot of walking, these were perfect.
My lipstick is Make Up Revolution in the colour "Rebel With A Cause" and is a lovely berry tone.
Picture
Picture
This was the first stall and it was beautiful, filled with scented dried fruit and peel wreathes and decorations.  My mum bought a 'fruit circle' and as lovely as it was, it smelled SO strongly of orange and spices, it got too much!  When we got home we had to put it in the cupboard under the stairs because it was giving us a headache, haha.
Picture
Picture
There were over 100 stalls and there was such a variety.
Picture
These were called "Smoothie Candles"
Picture
Picture
Picture
Picture
There were lots of yummy snack stalls  and I love how traditional they make them look, really makes it feel festive.
Picture
Picture
One stall was filled with festive decorations and that made me feel very Christmassy.
Picture
Picture
This was one of my favourite stalls, it wasn't selling anything but people could leave  notes  about what/who/where makes them happy or what they're thankful for. It's such a lovely idea and the gold really stood out in the sun.
Picture
After we'd seen all there was to see we wandered about the shops and stopped for something to eat becuase we were all freezing by this point and very peckish.
Picture
(excuse the iPhone quality and poor lighting)
We stopped at the West Cornish Pasty Co as we've eaten  there before and the wedges are delish! I also had a sausage roll. It was very tasty and warmed me right up.
Picture
It was getting dark by this point so we got  to see the tree  all lit up as well as the other lights which was magical.
I had such a nice day with my family and it was nice to go somewhere and do something different.

I'm going to my work Christmas meal tonight so my next post will be my OOTN.

Thanks for reading and speak to you soon!

Abi xxx

P.s. Emma, if you're reading, I got your message but because you didn't leave your email I can't reply!  Thank you for the lovely comments and  if you wanted to leave your message as a comment on either this post or another I'd love to be able to reply to you. xxx 
0 Comments

Christmas Nail Art Goodies

18/1/2015

0 Comments

 
Hello everyone!
As I mentioned last week in my Christmas Make Up blog post, today I'll be showing you all the nail art stuff I was lucky enough to receive for Christmas. 
Picture
- Shoe/Leg Nail Files
- Intensive Hand/Nail Mask
- Sally Hansen Double Duty Base and Top Coat
- 4 Sided Nail File/Buff/Shine 
- Butterfly Printed Fake Nails
- Three Barry M Nail Varnishes
- One Primark Nail Varnish 
Picture
Starting with the basics... 
The soap at work can be quite harsh on my hands and they get really sore and dry, they're not like that at the moment but if they get bad again this nourishing hand mask will be lovely and soothing! 
The Sally Hansen Double Duty is an excellent base and top coat, so it's always handy to have on hand (too many puns?). 
Picture
Nail files are always useful! These ones are funky looking too. Its also great to have a nail buffer, nail file and nail shiner(?) in one. 
Picture
As much as I love creating nail art designs, sometimes it's so much quicker and easier to just stick some preprinted designs on and then, when you're bored, just peel (although you should soak) them off!
Plus I think they are literally a £1 and there's lots of different designs. Fab. 
Picture
Here we have Barry M Gelly Hi-Shine in 'Plum', Barry M Limited Edition 'Jingle Bells' , Barry M Glitterati in 'Starlet' and a silvery blue nail varnish from P.S Love which is a Primark brand.
I haven't got round to using 'Jingle Bells' yet (it has gold confetti, with gold stars and red flecks) or the silvery blue, but I've used Plum and Starlet together and that looks lovely. The thing I love about the Glitterati paints is that they're like a lacquer so they're really sparkly, to the point where you could where them on their own, with two coats. 

So that's all my Christmas Nail Art stuff! 
I haven't decided what I'm posting next weekend so you'll just have to keep your eyes peeled (or follow my Twitter and Bloglovin ;) links are at the top!) 


Thanks for reading and I'll speak to you next week,
Abi xxx
0 Comments

Christmas Make Up

11/1/2015

2 Comments

 
Picture
Hello Everyone!
We've done enough reflecting and goal making for now, time to get back to make up and nail art. 
Today I want to share with you the make up I recieved for Christmas, I only asked for two things and was lucky enough to receive them both. 
This is the Make Up Revolution Ultimate Eyeshadow Collection and Urban Decay 'Naked On The Run'. 
Make Up Revolution is a sister brand to Make Up Academy, of which I am a huge fan of. I was hoping the quality would be of the same standard and it's similar, but not as good, but when you pay £10 (I think?) for 144 eye shadows, I'm not sure anyone can complain?! ONE HUNDRED AND FOURTY FOUR. 
Now the Naked On The Run has been my staple for like a week. I cannot get enough of it! Perfect for taking on a weekend away or something. Not ideal to carry round day to day as it's quite large (that wouldn't stop me, I just don't want to damage it!). It's ace. 

Make Up Revolution Ultimate Eyeshadow Collection

Picture
Picture
Picture
Picture
The palette consists of a mix of mattes, shimmers and neons. The only problem is that I don't think it's available anymore because it was a limited Christmas thing. They'd be mental not to bring it back though! It even comes with a little mirror and two double ended applicators, totally useless to me because I'm blind as a bat without my glasses but the little applicators are good for packing on colour. I'm sure swatches would have been useful for this blog post but I'm not down for swatching 144 different eye shadows. I don't have enough skin! 
You're pretty much set for life with this palette as you can create any look you fancy. Creamy with good colour pay off too, plus you can build colour by packing on more layers.

Urban Decay 'Naked On The Run'

Picture
Picture
Picture
It's beautiful isn't it? It is on the pricier side though at £37. Definitely worth it though in my opinion! 
The kit includes a travel-size 'Perversion' Mascara, travel-size 24/7 Glide-On Eye Pencil in the shade 'Stag', six new eye shadow shades, in the colours (left to right) 'Dive', 'Fix', 'Resist', 'Dare', 'Stun' and the larger size '50/50' which doubles as a highlighter. The set also includes a blush and bronzer and a full size lipgloss in the colour 'Sesso'. As usual with Urban Decay, the colour pay off is amazing and long lasting, I love the mascara as its really lengthening and thickening and the blush and highlight are beautiful with a delicate shimmer. 
I just love it! Would definitely recommend even though it is quite pricey. You have to bare in mind though that it would cost you A LOT more to buy all of it individually. 

That's it for this week! Thanks for reading!
Next Sunday will be about all the nail art stuff I got for Christmas, brace yourselves, I got a lot!

Abi xxx
2 Comments

Stag's Head | Christmas Nail Art Tutorial

17/12/2014

0 Comments

 
Hello everyone! 
This week's tutorial is of this stag's head. Not particularly Christmassy, but festive all the same. 
Picture
You wil need:
- A base colour, I chose white but apparently didn't feel like photographing it! (Sinful Colours 'Snow Me White')
- Red Nail Varnish (Miss Sporty Lasting Colour) 
- A Thin Paintbrush 

Picture
Picture
Start by making a rectangle on the bottom half of the nail, then add a semi circle below it to create the stag's head. Fill them in. Leave lots of room at the top of the nail for the antlers. 

Picture
Next, round off the top of his head and give him little ears. 

Picture
Lastly, create the antlers. Create two curved lines, starting from the top and leaving space in the middle. 
For the little antlers, just create two lines curving towards the middle but not touching. 

And that's it! I know I say this A LOT but wasn't it easy? It's always easier to break things down into steps... That, and I don't do things that are difficult!

If you recreate this make sure to use #abibailey or #nailartnut so I can see them!

I'll be back on Sunday with a gingerbread man recipe. Yum yum!

Thanks for reading and speak to you Sunday,
Abi xxx
0 Comments

Santa's Hat | Christmas Nail Art Tutorial

10/12/2014

0 Comments

 
Picture
Hello everyone!
This week's tutorial is Santa's hat. 
As usual, it's pretty simple and I've broken it down into steps for you. 
You will need: 
Picture
- Flesh Toned Nail Varnish (Revlon Nail Art Expressionist in '330/Silhouette')
- White Nail Varnish (Sinful Colours 'Snow Me White) [DISCONTINUED IN THE UK]
- Red Nail Varnish (Miss Sporty Lasting Colour)
- Thin Paintbrush 

Let's get started!
Picture
Start by painting your nails a flesh tone colour and then paint a white stripe across the middle of the nail. 
Picture
In the space above the white stripe, fill it in with the red. 
Then using the thin paintbrush, create a curvy, upside-down triangle and make sure that the point reaches the middle of the bottom section of the nail. 
Picture
Lastly, neaten up the shape and add a white blob at the bottom of the point, to create the fluffy bobble on Santa's hat. 

That's it! If you recreate any of my nail art designs, make sure to use #nailartnut or #abibailey so I can see them! 

Thanks for reading and speak to you on Sunday, where I'll show you how I've decorated my room for Christmas. T'is the season!

Abi xxx
0 Comments

Santa's Belt Buckle | Christmas Nail Art Tutorial

3/12/2014

0 Comments

 
Hello everyone!
Here is the first Christmas nail art tutorial: Santa's Belt Buckle!
You only need three colours and one tiny brush, so it's super easy.
Let's get started. 
Picture
You will need: 
- Red Nail Varnish (Miss Sporty Lasting Colour)
- Black Nail Varnish (Striper from Primark)
- Silver Nail Varnish (Barry M Foil Effects) 
- Thin Paintbrush 

Picture
Picture
Starting with a red base, paint a black strip across the third (lower) quater of the nail. 

Once that has dried, paint a small silver line, starting from the middle of the black strip, stretching across to the right side. 

Lastly, create a silver box, going through the silver line and extending past the black strip, above and below. 


How mega easy was that?! Only two simple steps. 


I think this makes a nice accent nail and would look fab paired with the next nail art design I have lined up... Keep your eyes peeled over here and on my nail art instagram! 


I'll be back with another blog post on Sunday. 
As always thanks for reading and speak to you soon!
Abi xxx
Picture
0 Comments

Gold Glitter Chevrons | Nail Art Details 

20/11/2014

0 Comments

 
Picture
Hiya!
These are the details for the 'Gold Glitter Chevrons' nail art that you might have seen on my nail art Instagram (@nailartnut). 
It's approaching Christmas time so I'm starting to get festive and play around with glitter a bit more plus I was dying to use my new chevron stencils!

Here's what I used:
- Sally Hansen Maximum Strength 
- Miss Sporty Lasting Colour in either 3294 or 160 (I'm not sure which number is the colour) 
- Chevron stencils from She Sells Seashells (see last blog post here)
- Barry M Aquarium Collection in 'Treasure Chest' 


Speak to you on Sunday!
Abi xxx
0 Comments

Christmas Nail Art

29/12/2013

0 Comments

 
Hello everyone!
Just a very quick blog post tonight because I'm still spending time with my family due to it being Christmas and the end of the year! 

I hope you all had a nice Christmas and did lovely things, I certainly did.
Thought I'd show you all the Christmas nail art I have done on my nail Instagram over the past couple of weeks. 
So I hope you like those designs, they're quite simple to do. The penguin and candy cane etc was what I painted on my sister's nails. She managed to keep them smudge-free for nearly two minutes, haha! These are all on my nail art Instagram @nailartnut
I hope you all have a good New Years, here's to more nail art in 2014! 


Speak to you soon, Abi xxx
0 Comments
    Abi Bailey
    Follow
    Hello Everyone!
    Thank you for visiting my blog; I post about beauty and lifestyle. Have a read and let me know what you think.
    All my social networks are at the top if you want to keep up with my daily life!
    Abi xxx
    Submit

    Archives

    September 2016
    August 2016
    July 2016
    June 2016
    May 2016
    April 2016
    March 2016
    February 2016
    January 2016
    December 2015
    November 2015
    October 2015
    September 2015
    August 2015
    July 2015
    June 2015
    May 2015
    April 2015
    March 2015
    February 2015
    January 2015
    December 2014
    November 2014
    October 2014
    September 2014
    August 2014
    July 2014
    June 2014
    April 2014
    March 2014
    February 2014
    January 2014
    December 2013
    October 2013
    September 2013

    Categories

    All
    5 Things Friday
    Advice
    Baking
    BEAUTY
    Beauty Favourites
    Birthday
    Blog
    Bloglovin
    Christmas
    Day Out
    DIY
    Easter
    Family
    Fashion
    First Entry
    Glossybox
    Goals
    Hair
    Halloween
    Lifestyle
    Make Up
    Nail Art
    Nail Art Details
    Nailartnut
    New Year
    Ootd/ootn
    Recommendations
    Review
    Shopping/Haul
    Skincare
    Tutorial
    Valentine's Day

Powered by Create your own unique website with customizable templates.