AbiJBailey
  • Blog
  • About Me
  • Twitter
  • Instagram
  • Nail Instagram
  • Pinterest

Easter Egg Nail Art Tutorial

4/4/2014

0 Comments

 
Hello everyone!
Today is the last day of my Colossal Easter/spring Nail Art Week! It's been fun.
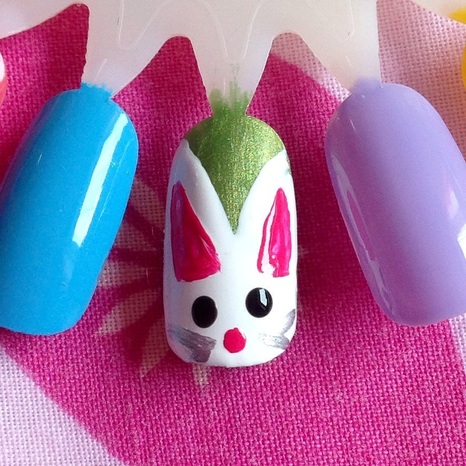
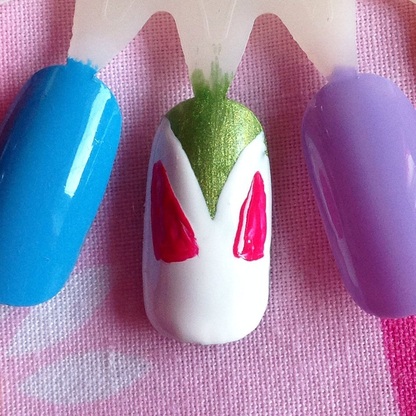
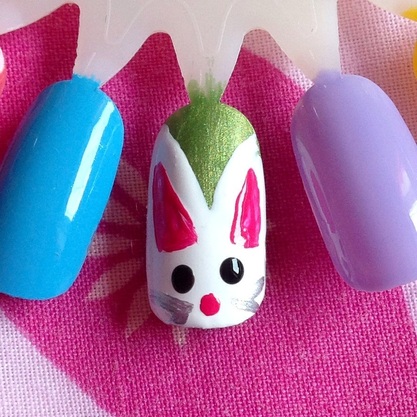
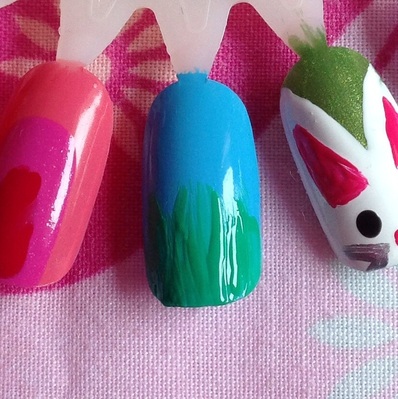
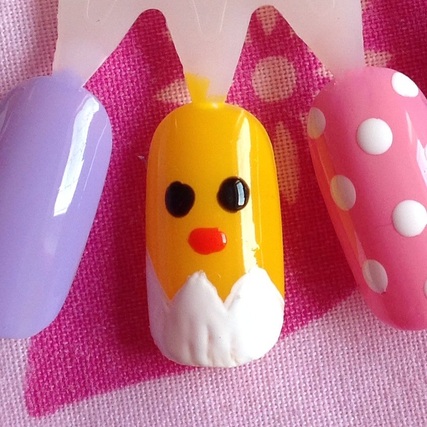
Today's look is the Easter Egg design. It's very easy and totally customisable. Here it is.
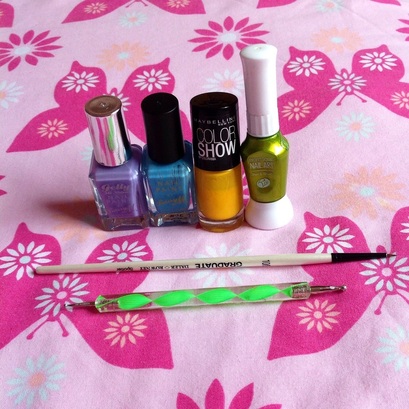
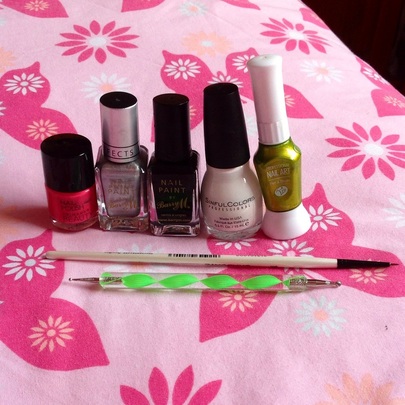
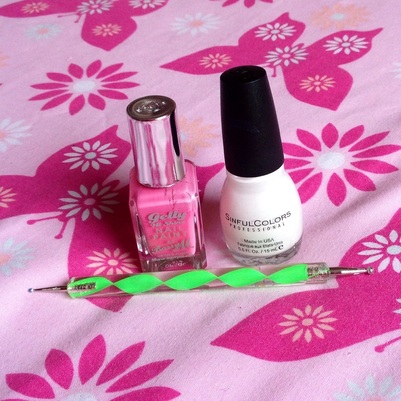
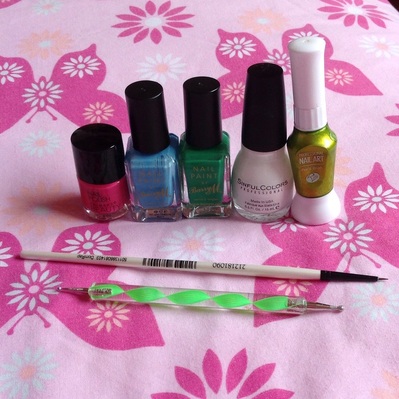
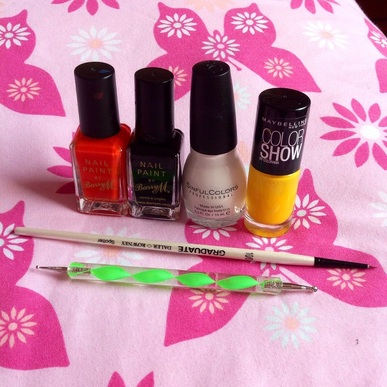
Picture
Picture
You Will Need:
  • Lilac nail varnish (mine is Barry M, Gelly Hi-Shine 'Prickly Pear')
  • Blue nail varnish (Barry M 'Blueberry Icecream')
  • Yellow nail varnish (Maybelline Colour Show 'Electric Yellow')
  • Green nail varnish (mine is super old from a nail art set I got years ago)
  • A dotting tool (or bobby pin) 
  • A thin paintbrush 

Picture
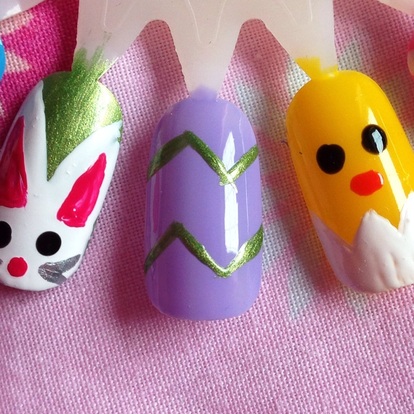
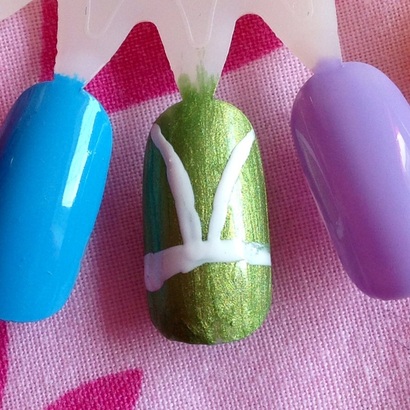
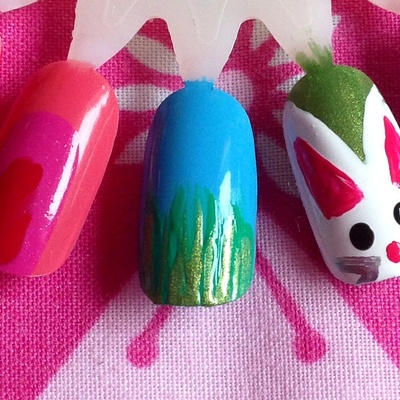
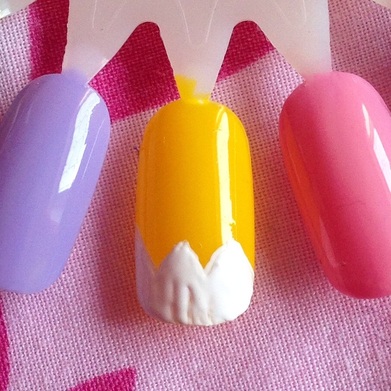
Dip the thin paintbrush into the green and create two chevron (diagonal) lines.

Picture
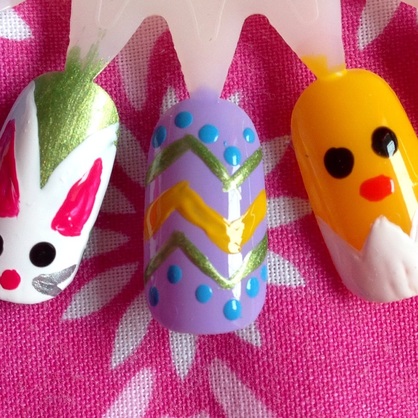
Clean off the paintbrush and dip it into the yellow and create another chevron stripe. 
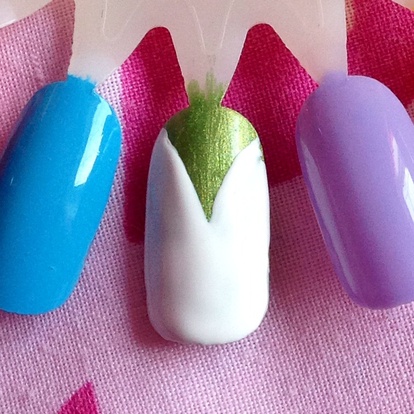
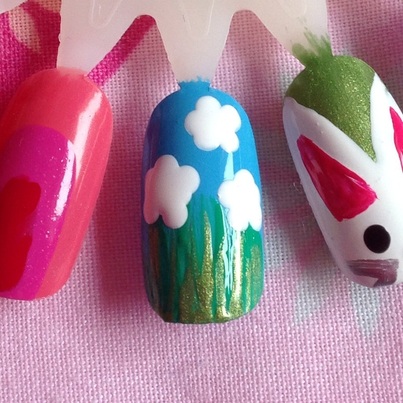
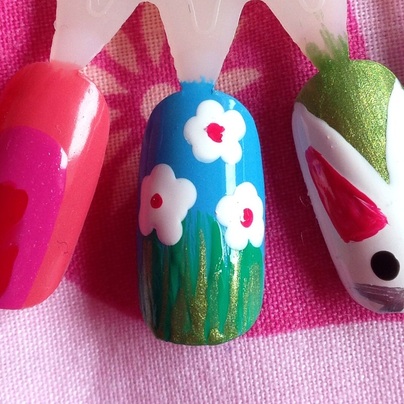
Dip the dotting tool into the blue and create a line of dots along the green chevrons. 


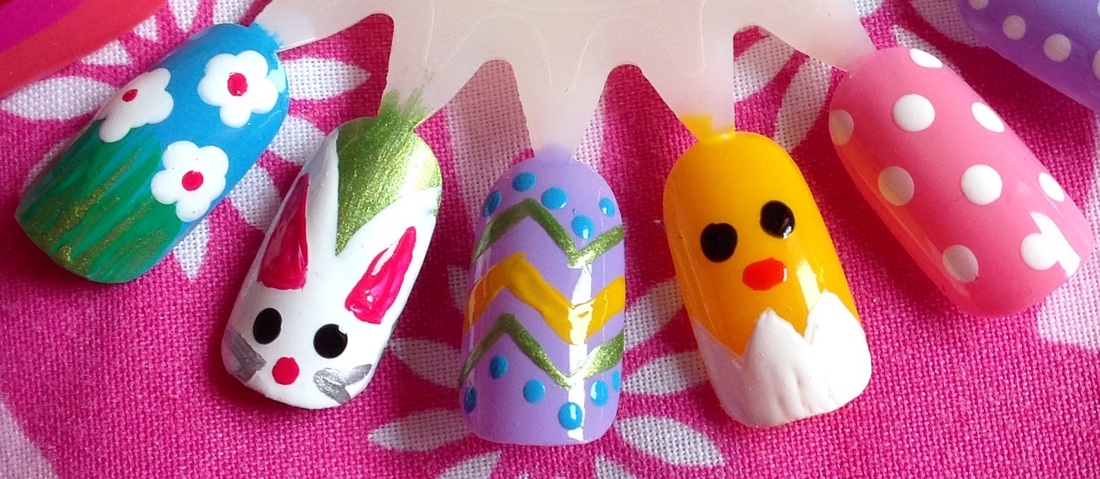
As usual leave lots of time for drying so that if you want to topcoat it, it won't smear. 
It's nice and festive isn't it! 

Well that's it for the Colossal Easter Nail Art Week, I've enjoyed it and I hope you have too. 

If you try out these designs use the hashtag #easterblogweek and I'll check them out! 

Maybe see you Sunday? I'm not sure yet, otherwise I'll see you when I see you.  


Abi xxx
0 Comments

Bunny Nail Art Tutorial

3/4/2014

0 Comments

 
Hello everyone!
We're nearly at the end of my Easter/spring nail art week! Today's design is the Bunny one. He's really cute and quite easy to do. Let's get started. 
Picture
Picture
You Will Need:
  • Pink nail varnish (mine is super old from Primark)
  • Silver nail varnish (Barry M Instant Nail Effects, Foil Effects 'Silver')
  • Black Nail Varnish (Barry M 'Black')
  • White nail varnish (Sinful Colours 'Snow Me White'
  • Green nail varnish (mine is from a nail art set I got years ago)
  • A thin paintbrush 
  • A dotting tool (or bobby pin)

Picture
Starting with a green base, use a thin paintbrush dipped in white to mark out the shape of the Bunny's head and ears.

Picture
Then using a dotting tool or the brush that comes with the white, fill it in.

Picture
Now using a thin paintbrush dipped in pink, mark out the inner ears and fill them in with a dotting tool or the thin paintbrush. 

Picture
Now, using a dotting tool or bobby pin dipped in pink, make a dot in the middle to create the nose.
Clean off the dotting tool, dip it into the black and create two dots either side of the nose and slightly higher for the eyes.
Using the thin paintbrush dipped in silver, create two arrow shapes (> and <) either side of the nose for the whiskers.


If you want to top coat him, give him a while to dry because black smears terribly.

There you have your little Bunny! Isn't he sweet?


Tomorrow is the last day and will be the Easter Egg design, so make sure you pop back for that!


See you then, 


Abi xxx
0 Comments

Polka Dots Nail Art Tutorial

2/4/2014

0 Comments

 
Hello everyone! 
Welcome back to day three and quite possibly the most pointless nail tutorial ever! I understand that no one needs a tutorial for this but once I had done the five designs and then the colossal nail art blog post, it was only then that I realised this isn't really a design. Anyway here it is.
Picture
Picture
You will need:
  • Pink nail varnish (mine is Barry M Gelly Hi-Shine 'Dragon Fruit'
  • White nail varnish (Sinful Colours 'Snow Me White' 
  • A dotting tool or bobby pin

Picture
Starting with a pink base, dip the large end of the dotting tool (or bobby pin) into the white and methodically place dots around the nail.
I like to start in the middle, creating dots evenly spaced apart and then either side, also evenly spaced apart.


You could use colours that link with the other designs or use more springlike colours. 


The smaller the dots, the daintier it looks, but with fun nail art designs like these Easter ones, I think larger dots work better.
But it's totally up to you!

I bet you're glad you wasted your time reading that! I promise tomorrow's will be more interesting as I will be doing the Bunny design, it should be fun!

See you then, 


Abi xxx
0 Comments

Daisies Nail Art Tutorial

1/4/2014

0 Comments

 
Hello everyone !
Welcome back to day two of my colossal Easter/spring nail art tutorials. Today's tutorial is the Daisies design. It looks quite involved, but that's because it's got lots of layers, it's really very simple. Give it a go!
Picture
Picture
You will need:
  • Pink nail varnish (mine is from Primark and is very old and running out)
  • Light blue nail varnish (Barry M 'Blueberry Icecream')
  • Green nail varnish (Barry M 'Spring Green')
  • Light green nail varnish (mine is from a nail art set I got years ago)
  • White nail varnish (Sinful Colours 'Snow Me White')
  • A thin paintbrush 
  • A dotting tool (or bobby pin/toothpick)

Picture
Starting with a blue base, use a thin paintbrush dipped in green to stroke blades of grass (start from the bottom of the nail)


You might need to do this a couple of times to get an opaque colour

Picture
Using the thin brush dipped in light green (mine is also shimmery) create more blades of grass, just fewer so it doesn't cover the darker green.

Picture
Now using the larger end of the dotting tool (or bobby pin), create five dots to create the daisy (you might want to place one in the middle to connect them).

Picture
Using the smaller end of the dotting tool (or bobby pin) dipped in the pink, create the centres of the daisies. 


Then that's it! If you want to top coat them make sure you leave ample time for it to dry or it might smear. 


Hope you like it, tomorrow's tutorial will be the pink and white dots (not very exciting I know)


See you tomorrow!

Abi xxx
0 Comments

Chick Nail Art Tutorial

31/3/2014

0 Comments

 
Hello everyone!
As promised here is the Chick nail art tutorial. It's simple and very cute, so give it a go! 
Picture
Picture
You will need:
  • Orange nail varnish (mine is Barry M 'Block Orange')
  • Black nail varnish (Barry M 'Black')
  • White nail varnish (Sinful Colours 'Snow Me White' - my all time favourite white polish!)
  • Yellow nail varnish (Maybelline Colour Show 'Electric Yellow')
  • A small paintbrush
  • And a dotting tool (or a bobby pin/toothpick)


Picture
Using the tiny paintbrush or a tooth pick dipped in white, mark a zig zag across the bottom third of the nail and then fill in the bottom with the white.

Picture
Using the larger end of the dotting tool (or bobby pin) dip it into the black to dot two eyes then clean the dotting tool and dip in into the orange. Press down and drag slightly across to make the beak.

Leave lots of time for it to dry if you want to top coat it, otherwise it might smear.


There you have it! Told you it was easy. 

Pop back tomorrow for the Daisies tutorial.

See you tomorrow, 

Abi xxx
0 Comments

Colossal Easter Nail Art Week

30/3/2014

0 Comments

 
Hello everyone!  
Happy Mothers' Day! 
As usual I've been useless with regularly posting on here, and have been EVEN worse on my nailstagram (yes I actually call it that) but I'm back today! I thought as an apology for being rubbish and because I have been lacking nail art in my life recently, I thought I'd do a spring/Easter nail art week. What I mean by this is that I have five spring/Easter nail art tutorials and I am going to post one a day (starting from tomorrow). Does that sound fun? Here's the photo of the five designs...
Picture
You could wear these all together or just use one as an accent nail or you could wear one design across all of your nails, it's up to you. I know the pink and white one is a bit of a cheat but it looks dainty across all of your nails and works well with the other four designs- it adds a bit of calm to liveliness of the others.
Those are the designs, get excited, I'll be back tomorrow with the chick design! 


Hope you've had lovely weekends, I'll see you tomorrow!


Abi xxx
0 Comments
    Abi Bailey
    Follow
    Hello Everyone!
    Thank you for visiting my blog; I post about beauty and lifestyle. Have a read and let me know what you think.
    All my social networks are at the top if you want to keep up with my daily life!
    Abi xxx
    Submit

    Archives

    September 2016
    August 2016
    July 2016
    June 2016
    May 2016
    April 2016
    March 2016
    February 2016
    January 2016
    December 2015
    November 2015
    October 2015
    September 2015
    August 2015
    July 2015
    June 2015
    May 2015
    April 2015
    March 2015
    February 2015
    January 2015
    December 2014
    November 2014
    October 2014
    September 2014
    August 2014
    July 2014
    June 2014
    April 2014
    March 2014
    February 2014
    January 2014
    December 2013
    October 2013
    September 2013

    Categories

    All
    5 Things Friday
    Advice
    Baking
    BEAUTY
    Beauty Favourites
    Birthday
    Blog
    Bloglovin
    Christmas
    Day Out
    DIY
    Easter
    Family
    Fashion
    First Entry
    Glossybox
    Goals
    Hair
    Halloween
    Lifestyle
    Make Up
    Nail Art
    Nail Art Details
    Nailartnut
    New Year
    Ootd/ootn
    Recommendations
    Review
    Shopping/Haul
    Skincare
    Tutorial
    Valentine's Day

Powered by Create your own unique website with customizable templates.