AbiJBailey
  • Blog
  • About Me
  • Twitter
  • Instagram
  • Nail Instagram
  • Pinterest

'Brogue' Style Nail Art | Tutorial

27/7/2014

0 Comments

 
Hello Everyone!
Hope you've all had a fun weekend.
Today I thought I'd do a nail art tutorial as my blog has been very make up and shopping based recently (which I love but thought it needed a change). 
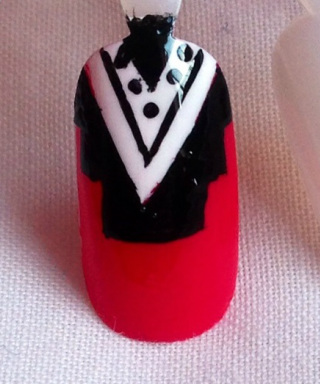
I saw this design on Instagram but as it was just featured and not by the actual account holder, I can't credit it. I'm not sure what you'd call it but it reminds me of the black and white brogues! 
Picture
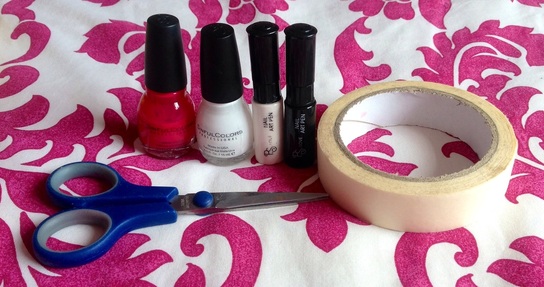
Here's what you'll need:
Picture
- Bright Pink/Coral Nail Varnish (Sinful Colours in 'Folly')
- White Nail Varnish (Sinful Colours in 'Snow Me White')
*Bare in mind Sinful Colours has been discontinued in the UK*
- A White Striper and a Black Striper (Mine came in a set of three from Primark and have dotting tools built into the cap)
(- Black paint and a small dotting tool/tooth pick if you don't have the stripers from Primark)
- Masking Tape and Scissors (Not a necessity, it just makes the first step quicker/neater)


Picture
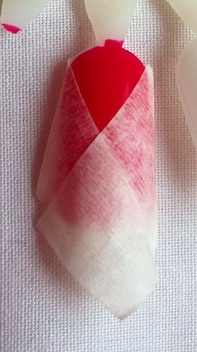
Starting with a pink nail, using two small bits of masking tape, cover the bottom of the nail to create a triangle at the top.


Alternatively, you could just use a white striper to create two lines and then fill it it.
Picture
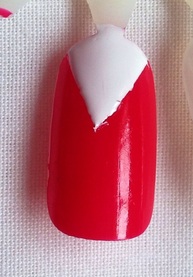
Paint over the triangle shaped gap with the white (you might need to be quite generous to get an opaque colour) and then quickly but gently remove the tape to get clean lines.


You could also use the white striper to do this or just to neaten up the edges.
Picture
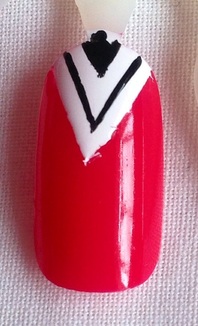
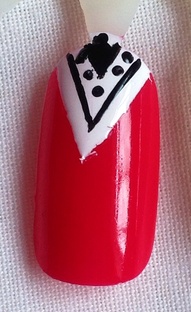
Using the black striper create a V along the edge and then a small triangle at the top. 


The best way to do this is to hold the striper at the middle and gently pull back and then do the same for the other line. 
Picture
Using the dotting tool end of the striper (or a dotting tool/tooth pick dipped in black paint) create a row of little dots between the V and the triangle.
Picture
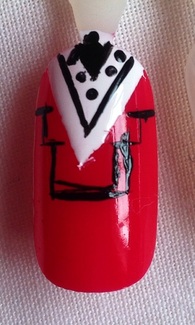
Using the black striper, map out the step shapes (if you don't know what I'm on about, scroll back to the top to look at the design).


This could take a couple of attempts to get it right (can you tell?).
Picture
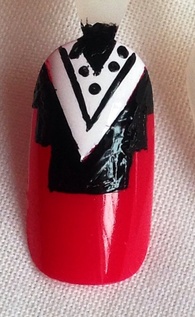
Fill the step shapes in with the black striper or a big dotting tool dipped in black paint.
Picture
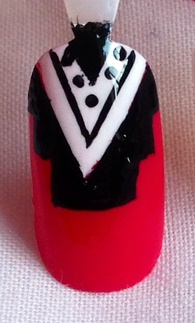
Once everything has dried, use a top coat to smooth out the design and make it long lasting.


And you're done!


There's quite a lot of steps to this one, but once you break it down it's not too tricky! 
That's it for this week! If you do give them a go use #AbiBailey or #NailArtNut, I'd love to see them! 

As always, thanks for reading and I'll speak to you soon!

Abi xxx
0 Comments

Beauty Haul/Review

13/7/2014

0 Comments

 
Hello everyone! 
Hope you've had a fun weekend.
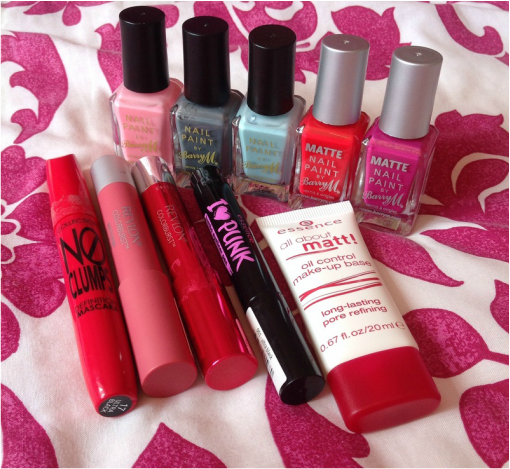
I've done a fair bit of shopping recently so I thought I'd show you the beauty bits I've bought over a couple of shopping trips. A massive bonus is that everything was very affordable and reasonably priced!
Picture
Picture
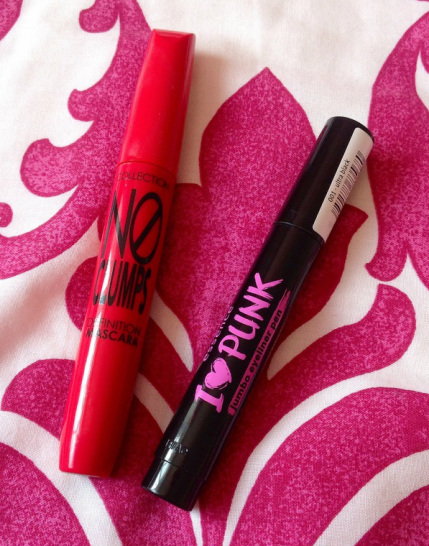
This is the No Clumps Definition Mascara by Collection and its excellent, really lengthens my lashes and is very buildable, and its also only £3. The I <3 Punk Jumbo Eyeliner Pen is from a new make up range in Wilkos called 'Essence' and I was a bit weary because I am so attached to my Maybelline Gel Eyeliner, I didn't think I could use, let alone like, a different eyeliner. I've also never had much luck with eyeliner pens as they're always too watery. It claims to be 'deep black, water resistant, long lasting and smudgeproof', well I used it for the first time today and I can agree that it is deep black, long lasting and smudgeproof but I don't agree with it being water resistant because I tested it on my hand and it washed off very easily, but I'm not looking for it to be waterproof so I'm not bothered! It's easy to use and I think this was only £1.60 or something too! Bargain!
Picture
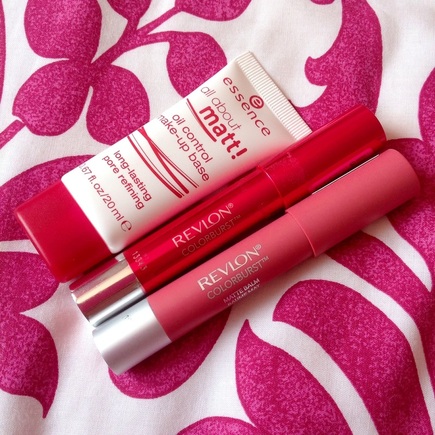
This is the Oil Control Make-Up Base (ie a primer). I can't really give it a thorough review as I wore it for the first time today and have only been wearing it since about 2pm but from that, I really like it. I struggle with oily skin and this primer claims to 'balance out oily skin, minimise the appearance of pores and improve make up wear'. I think I look less shiny, my pores look smaller and I haven't had to touch up my foundation or powder and for only £3.50 you can't really complain! Especially as I was considering buying the full size version of the Smashbox Photo Ready primer that I had a tester of (and loved) and that's £25! 
Think I'm really going to like this Essence range! 
I have heard nothing but good things about the Revlon Lip Crayons and as I mentioned in my last blog post, you cannot go wrong with Revlon lip products. I bought the Revlon Colourburst Lacquer Balm in 120 'Vivacious' and the Revlon Colourburst Matte Balm in 205 'Elusive'. These were two for £10 in Superdrug and considering they are £8 each I would have been mental not to get two! I have worn the Lacquer Balm and I absolutely love it, the colour is gorgeous, it's really pigmented, it's long lasting and it smells of mint and leaves your lips tingly. I haven't had chance to wear the Matte Balm yet but I have tried it and I love the colour and the matte effect, it's not drying like a lot of matte lip products. The colour is the perfect nude/pink colour I have been looking for. 
Picture
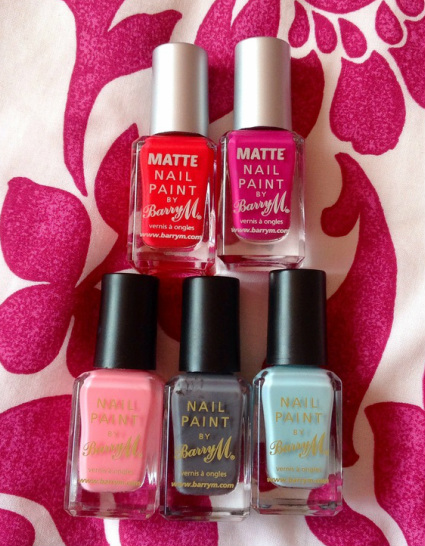
We all know I like nail varnish A LOT so how could I pass up a 2 for 3 on all nail stuff in Superdrug? I bought the two matte colours (Copa Cabana and Rhossili) with the pale pink (Strawberry Ice Cream) and as I was only repurchasing Strawberry Ice Cream, because mine had gone thick and gloopy, I was really pleased to get it for free! On a separate occasion I bought the grey (which is just called Grey, how imaginative) and the blue (called Blue Moon). I went for the matte shades purely because I liked the colours! They are very pigmented, dried quickly and look really nice matte, the only issue is that they chip and peel quite easily, this could be down to the basecoat I used but I'm not sure, just thought I'd mention it! They are £4 each. I bought the grey because I don't have a grey and I wanted it to go with an outfit I had planned and I bought the blue because I really wanted a very pale blue. This one is nice because it has a slight shimmer to it which I like! I am a HUGE fan of Barry M Nail Paints and I especially like that they are only £3. I feel like I've said 'like' too much now.


Anyway there's a little insight into my recent beauty buys!
Have you bought anything you're particularly fond of recently? Let me know! 


Thanks for reading, I didn't realise I had that much to say! 


Speak soon,

Abi xxx
0 Comments

I have a bit of an addiction... | Lip Products

6/7/2014

0 Comments

 
Hello everyone! 
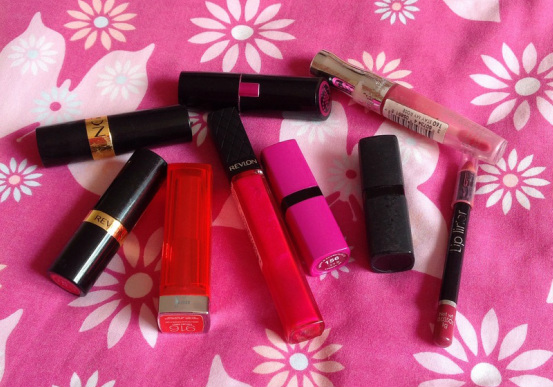
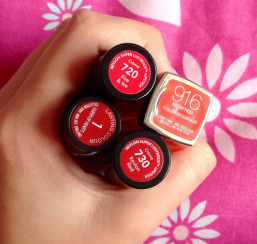
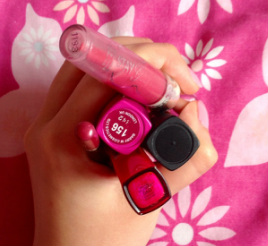
Yep it's true, I have an addiction to lip products so I thought I would show you my favourite ones. Sound good? I might make this a little series because I have an addiction to most make up products! 
Picture
Picture
Picture
Picture
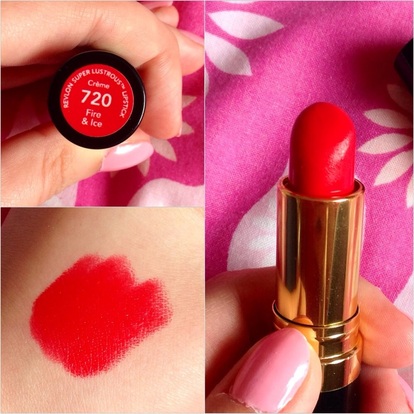
This is Revlon Super Lustrous Lipstick in 'Fire and Ice' and is a bright summery red. I am a HUGE fan of the Revlon lip products, especially the lipsticks, they're super creamy, long lasting and really pigmented.
Picture
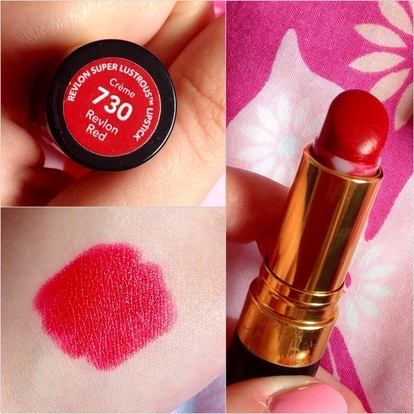
This is another Revlon Super Lustrous Lipstick and this one is called 'Revlon Red'. This is a typical deep red and it's also creamy, long lasting and very pigmented. Love it. Very classy.
Picture
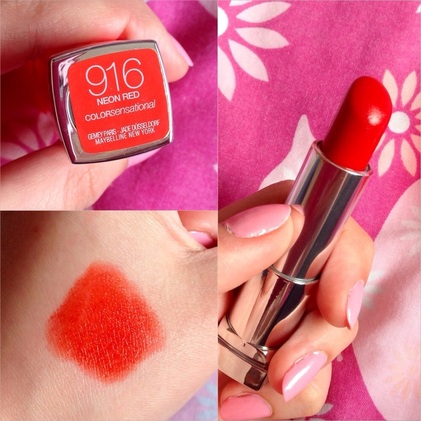
This is a Maybelline Colour Sensational lipstick and this is in the colour 'Neon Red'. It's more of an orangey red and is quite sheer but buildable, it's nice for summer time (how coincidental).
Picture
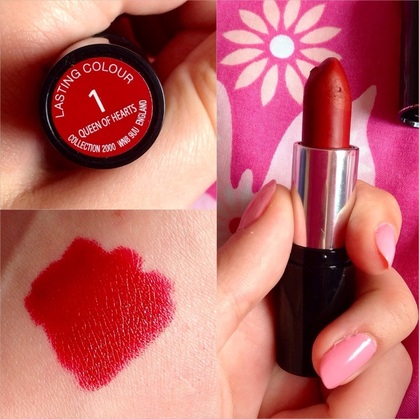
This will always be one of my favourites because it is such a vampy dark red and I love it, I can't get enough. It's a shame it's summer because I LOVE dark lipsticks and can't really get away with it at the moment (although I'm still going to try). This is a Collection lipstick in the Lasting Colour range, I love the name 'Queen of Hearts' too. Just a side note, I've had it a while and it still says 'Collection 2000' on the sticker so I'm not sure if they still do it, I'll be very sad if they don't :(
Picture
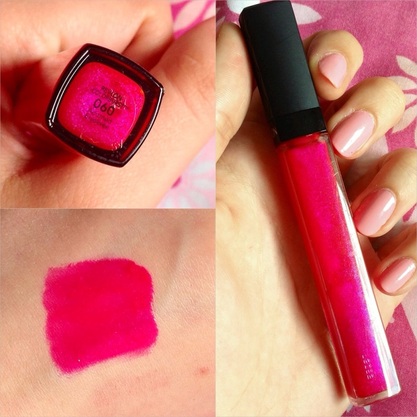
On to the pinks, I'm not normally a fan of lipgloss (and I've mentioned it in my Current Beauty Faves post a while back) but you cannot beat Revlon for a good lipgloss. This is Revlon Colourburst in 'Adorned' (love the name) and is a proper neon pink colour, the swatch does it no justice! I get so many compliments on this lipgloss, it's beaut.
Picture
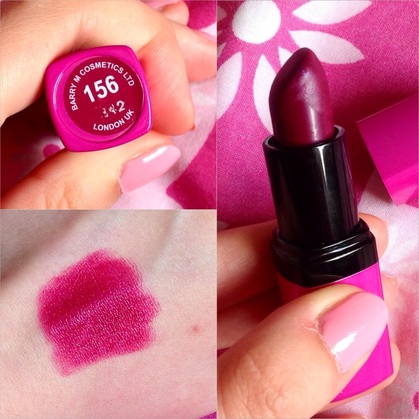
This is a another dark colour *swoons* and this is Barry M Ultra Moisturising Lip Paint in number 156. This is a really deep pinky purple and it's such a nice colour. It's more of a plum purple so it's easy to wear and not too daring. I miss the rubbish weather when I could get away with these vampy shades! Roll on autumn!
Picture
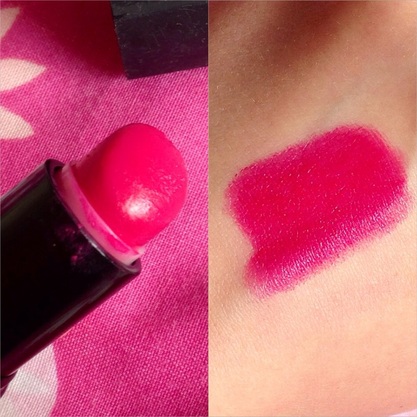
As you can tell, I've had this lipstick a long time and I've nearly run out, I've had it so long that the print has rubbed off the bottom (which is why I didn't take a photo of it) I looked on the Barry M website and I think it is the number 145 or 146, I can't really tell. It's just one of their normal Lip Paints. This is more of a blue toned pink but it's just a typical bright pink colour. It's easy to wear and also very summery (are you detecting a theme?).
Picture
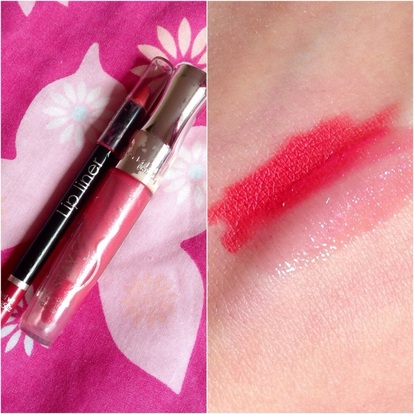
Now this is a bit weird but I thought I should include it anyway because it's one of my favourite combinations. This is a massively old (and by old I mean at least six years) lip pencil that came in a make up box/set thing I got for my thirteenth birthday (I think) and this is an old Rimmel lipgloss. The lip liner is like a perfect nude/pink and I like to fill my lips in with it completely and then blend it with a layer of the sheer lipgloss. It's one of my favourite lip looks! (Thinking about I should probably bin the lipgloss for sanitary reasons, but oh well)

So those are my favourite lip products,
Thanks for reading and I shall speak to you soon!

Abi xxx
0 Comments

Watermelon Nail Art Tutorial

2/7/2014

0 Comments

 
Hello everyone! 
As promised, here is the mid-week blog post of the watermelon slice nail art tutorial! 
Enjoy!
Picture
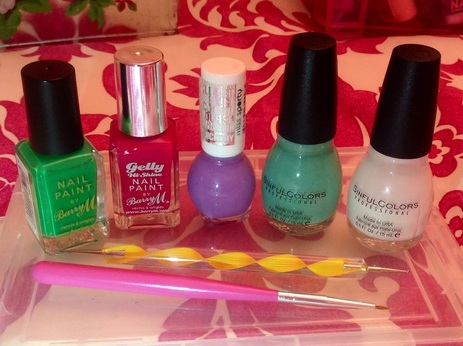
Here's what you'll need:
Picture
- Green nail varnish (Barry M in Spring Green)
- Red/Pink nail varnish (Barry M Gelly Hi-Shine in Pomegranate)
- Lilac nail varnish (Miss Sporty Quick Dry Clubbing Colours in 344)
- Light Green nail varnish (Sinful Colours in Mint Apple*)
- White nail varnish (Sinful Colours in Snow Me White*)
- Small Dotting Tool
- Small/Thin Brush
*Sinful Colours is being discontinued in the UK
(I have no idea about the rest of the world)

Picture
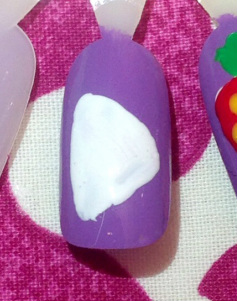
I used lilac as my base colour, but as I said last time, you can use whatever colour, I just thought it was summery and contrasted well with the green and pink.
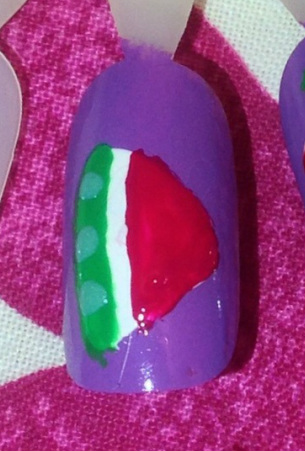
Using the brush dipped in white, map out a triangle shape for the watermelon slice, and fill it in using the brush, the nail varnish brush, or a big dotting tool.
Picture
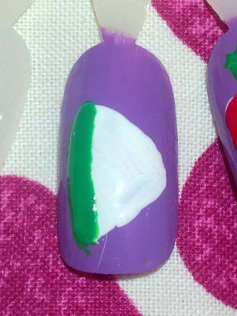
Cleaning off the white from the brush, dip it into the dark green and paint a stripe along one of the edges. This will be the skin of the watermelon.


You might need two coats to get a good opacity, I did.
Picture
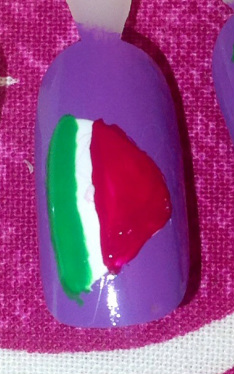
Again, remembering to clean off the brush, leave a gap to look like the rind and fill in the rest of the triangle with the pink/red.


(It drives me mental that you can't resize the text boxes!)
Picture
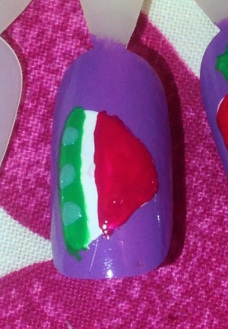
Once the green has dried, use the dotting tool dipped in the light green to add some dots to add more depth and texture to the skin of the watermelon.

You could if you wanted to, add a few tiny black dots to the pink to look like pips but a) I only just realised I had forgot to do that and I took the photos last week, b) It might make the small space look dark, and c) the design is actually quite small in reality so it would go unnoticed anyway.


Done!
Another colourful summery design, this would also look cute as an accent nail.
When you break it down it's easy to manage!
I would love to see your recreations so if you give them a go, tag me in them or use the hashtag #nailartnut or #abibailey, I'll be on the lookout!


I should be back on Sunday with another post for you, until then,
thanks for reading!
Abi xxx

0 Comments
    Abi Bailey
    Follow
    Hello Everyone!
    Thank you for visiting my blog; I post about beauty and lifestyle. Have a read and let me know what you think.
    All my social networks are at the top if you want to keep up with my daily life!
    Abi xxx
    Submit

    Archives

    September 2016
    August 2016
    July 2016
    June 2016
    May 2016
    April 2016
    March 2016
    February 2016
    January 2016
    December 2015
    November 2015
    October 2015
    September 2015
    August 2015
    July 2015
    June 2015
    May 2015
    April 2015
    March 2015
    February 2015
    January 2015
    December 2014
    November 2014
    October 2014
    September 2014
    August 2014
    July 2014
    June 2014
    April 2014
    March 2014
    February 2014
    January 2014
    December 2013
    October 2013
    September 2013

    Categories

    All
    5 Things Friday
    Advice
    Baking
    BEAUTY
    Beauty Favourites
    Birthday
    Blog
    Bloglovin
    Christmas
    Day Out
    DIY
    Easter
    Family
    Fashion
    First Entry
    Glossybox
    Goals
    Hair
    Halloween
    Lifestyle
    Make Up
    Nail Art
    Nail Art Details
    Nailartnut
    New Year
    Ootd/ootn
    Recommendations
    Review
    Shopping/Haul
    Skincare
    Tutorial
    Valentine's Day

Powered by Create your own unique website with customizable templates.