Hello Everyone!
Hope you've all had a fun weekend.
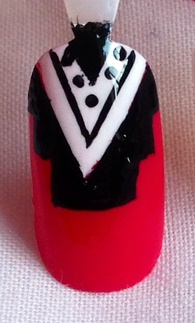
Today I thought I'd do a nail art tutorial as my blog has been very make up and shopping based recently (which I love but thought it needed a change).
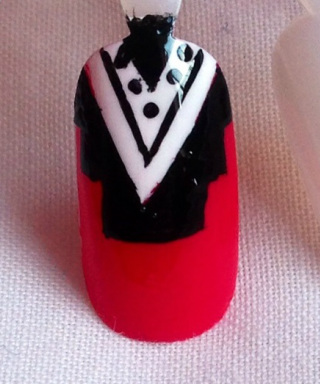
I saw this design on Instagram but as it was just featured and not by the actual account holder, I can't credit it. I'm not sure what you'd call it but it reminds me of the black and white brogues!
Hope you've all had a fun weekend.
Today I thought I'd do a nail art tutorial as my blog has been very make up and shopping based recently (which I love but thought it needed a change).
I saw this design on Instagram but as it was just featured and not by the actual account holder, I can't credit it. I'm not sure what you'd call it but it reminds me of the black and white brogues!
Here's what you'll need:
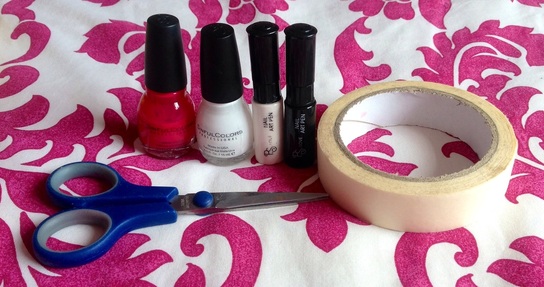
- Bright Pink/Coral Nail Varnish (Sinful Colours in 'Folly')
- White Nail Varnish (Sinful Colours in 'Snow Me White')
*Bare in mind Sinful Colours has been discontinued in the UK*
- A White Striper and a Black Striper (Mine came in a set of three from Primark and have dotting tools built into the cap)
(- Black paint and a small dotting tool/tooth pick if you don't have the stripers from Primark)
- Masking Tape and Scissors (Not a necessity, it just makes the first step quicker/neater)
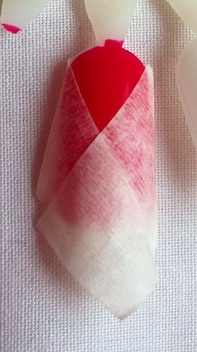
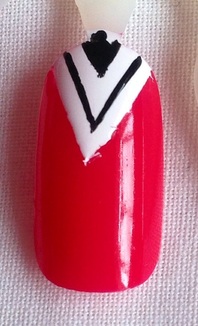
| Starting with a pink nail, using two small bits of masking tape, cover the bottom of the nail to create a triangle at the top. Alternatively, you could just use a white striper to create two lines and then fill it it. |
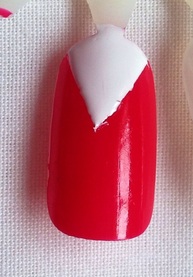
| Paint over the triangle shaped gap with the white (you might need to be quite generous to get an opaque colour) and then quickly but gently remove the tape to get clean lines. You could also use the white striper to do this or just to neaten up the edges. |
| Using the black striper create a V along the edge and then a small triangle at the top. The best way to do this is to hold the striper at the middle and gently pull back and then do the same for the other line. |
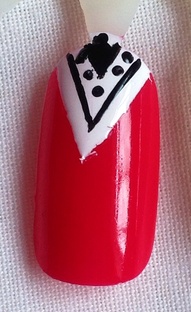
| Using the dotting tool end of the striper (or a dotting tool/tooth pick dipped in black paint) create a row of little dots between the V and the triangle. |
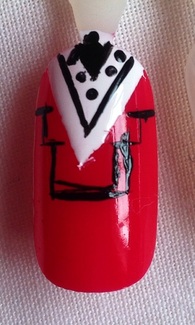
| Using the black striper, map out the step shapes (if you don't know what I'm on about, scroll back to the top to look at the design). This could take a couple of attempts to get it right (can you tell?). |
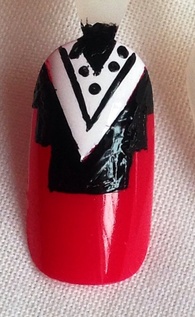
| Fill the step shapes in with the black striper or a big dotting tool dipped in black paint. |
| Once everything has dried, use a top coat to smooth out the design and make it long lasting. And you're done! There's quite a lot of steps to this one, but once you break it down it's not too tricky! |
That's it for this week! If you do give them a go use #AbiBailey or #NailArtNut, I'd love to see them!
As always, thanks for reading and I'll speak to you soon!
Abi xxx
As always, thanks for reading and I'll speak to you soon!
Abi xxx